Basic CRUD Operations Using Hasura GraphQL with Distributed SQL on GKE
March 31, 2020
Editor’s note: This post was updated July 20, 2020 with new Helm and YugabyteDB versions
GraphQL is an MIT-licensed project originally developed at Facebook in 2012 and open-sourced a few years later. Two popular GraphQL projects, Hasura and Apollo, have reported download numbers of 29 and 33 million, respectively. Why? Think of GraphQL as a query language for APIs and a runtime for fulfilling those queries with your existing data. GraphQL provides a complete and understandable description of the data in your API, gives clients the power to ask for exactly what they need and nothing more, plus makes it easier to evolve APIs over time. GraphQL is also a robust technology and is being used in production at Facebook, GitHub, Pinterest, and Intuit.

What is Hasura?
Hasura is one of the leading vendors in the GraphQL ecosystem. They offer an open source engine that connects to your databases and microservices, and then auto-generates a production-ready GraphQL backend.
What is YugabyteDB?
YugabyteDB is an open source, high-performance distributed SQL database built on a scalable and fault-tolerant design inspired by Google Spanner. Yugabyte’s SQL API (YSQL) is PostgreSQL wire compatible.
Why Hasura GraphQL and YugabyteDB?
Writing complex database queries can be hard and time consuming; a GraphQL engine like Hasura can help you quickly alleviate these challenges and exploit the benefits of the GraphQL API against a database. Hasura does the heavy lifting under the covers, and automatically generates queries to fetch the data. When combined with YugabyteDB, you inherit all the benefits of a PostgreSQL-compatible, distributed SQL system, with features like high performance, extreme resilience to failures and geo data distribution. The result is a fast and highly available backend that makes it easy to develop applications and microservices against.
In this blog post, we are going to show you how to get started with Hasura and YugabyteDB running on Google Kubernetes Engine (GKE) and conclude by showing you how to perform some basic CRUD operations. Look for more in-depth blog posts concerning Hasura and YugabyteDB in the coming weeks where we will cover sophisticated CRUD operations and benchmarking results.
Prerequisites
Here is the environment required for this tutorial:
- YugabyteDB 2.2.0 installed on GKE using Helm
- A Google Cloud Platform account
Set up a Kubernetes cluster on Google Cloud Platform
To deploy YugabyteDB on the Google Cloud Platform (GCP), we first have to set up a cluster. To create the cluster in Google Kubernetes Engine (GKE) navigate to Kubernetes Engine> Clusters > Create Cluster.
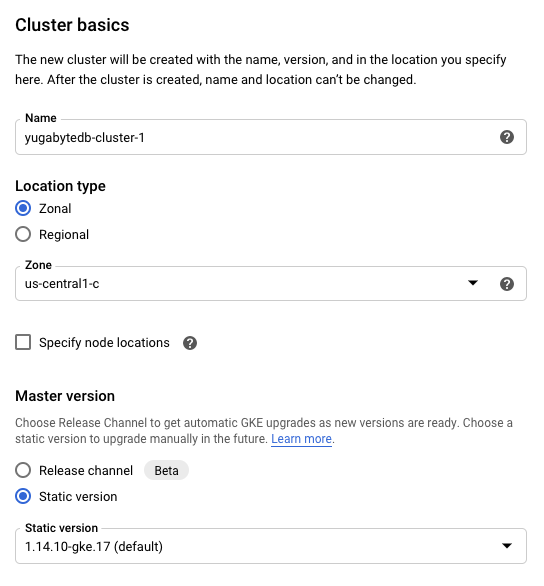
For the configuration of the cluster choose a Standard cluster using the default options.
- Name: yugabytedb-cluster1
- Zone: us-central1-a
- Master version: 1.14.10-gke 17 (default)
- Number of nodes: 3
- Machine type: n1-standard-4 (4 vCPU, 15 GB memory)
Next, connect via the Google Cloud Shell and verify that the nodes are running by using the following command:
$ gcloud container clusters list
The value for status should be “RUNNING”.
Installing YugabyteDB on the GKE Cluster using Helm
In this section we are going to install YugabyteDB on the cluster. The complete steps are documented here.
The first thing to do is to add the charts repository.
$ helm repo add yugabytedb https://charts.yugabyte.com
Now, fetch the updates.
$ helm repo update
Create a namespace. In this case we’ll call it yb-demo.
$ kubectl create namespace yb-demo
Expected output:
namespace/yb-demo created
We are now ready to install YugabyteDB. In the command below we’ll be specifying values for a resource constrained environment.
$ helm install yb-demo yugabytedb/yugabyte \
--set resource.master.requests.cpu=1,resource.master.requests.memory=1Gi,\
resource.tserver.requests.cpu=1,resource.tserver.requests.memory=1Gi,\
enableLoadBalancer=True --namespace yb-demo --wait
To check the status of the cluster, execute the below command:
$ kubectl get services --namespace yb-demo
Take a look at the v1/Service section:

Note the external-IP for LoadBalancer which we are going to use to establish a connection between YugabyteDB and Hasura. From the screenshot above we can see that the IP is 35.222.237.132 and the YSQL port is 5433.
Creating the sample database
The next step is to download a sample schema and data. You can find a variety of sample databases that are compatible with YugabyteDB in our Docs. For the purposes of this tutorial we are going to use the northwind sample database. The northwind database contains the sales data for a fictitious company called “Northwind Traders,” which imports and exports specialty foods from around the world. The northwind database is an excellent tutorial schema for a small-business ERP, with customers, orders, inventory, purchasing, suppliers, shipping, employees, and single-entry accounting.
Connect to the yb-tserver-pod by running the following command:
$ kubectl exec -n yb-demo -it yb-tserver-0 -- /bin/bash
To download the schema and data files, run the following commands:
$ wget https://raw.githubusercontent.com/yugabyte/yugabyte-db/master/sample/northwind_ddl.sql
$ wget https://raw.githubusercontent.com/yugabyte/yugabyte-db/master/sample/northwind_data.sql
Note: If the Google Cloud Shell tells you that the wget command does not exist, you can execute:
$ yum install wget -y
To connect to the YSQL service exit out of the pod shell and run the following command:
$ exit
$ kubectl exec -n yb-demo -it yb-tserver-0 -- ysqlsh -h yb-tserver-0.yb-tservers.yb-demo
Create a database and connect to it using the following commands:
northwind=# CREATE DATABASE northwind;
northwind=# \c northwind;
Create the database objects and load them up with data using the following commands:
northwind=# \i 'northwind_ddl.sql';
northwind=# \i 'northwind_data.sql';
Verify that the tables are created by running the following command:
northwind-# \d

                 List of relations
 Schema |          Name          | Type  |  Owner
--------+------------------------+-------+----------
 public | categories             | table | yugabyte
 public | customer_customer_demo | table | yugabyte
 public | customer_demographics  | table | yugabyte
 public | customers              | table | yugabyte
 public | employee_territories   | table | yugabyte
 public | employees              | table | yugabyte
 public | order_details          | table | yugabyte
 public | orders                 | table | yugabyte
 public | products               | table | yugabyte
 public | region                 | table | yugabyte
 public | shippers               | table | yugabyte
 public | suppliers              | table | yugabyte
 public | territories            | table | yugabyte
 public | us_states              | table | yugabyte
(14 rows)
Verify we have data by issuing a few simple SELECTs:
northwind=# SELECT count(*) FROM products;
 count
-------
    77
(1 row)

northwind=# SELECT count(*) FROM customers;
 count
-------
    91
(1 row)

northwind=# SELECT count(*) FROM orders;
 count
-------
   830
(1 row)
Setting up Hasura to use YugabyteDB
Get the Hasura Kubernetes deployment and service files by executing the commands below.
northwind=# exit
$ wget https://raw.githubusercontent.com/hasura/graphql-engine/master/install-manifests/kubernetes/deployment.yaml
$ wget https://raw.githubusercontent.com/hasura/graphql-engine/master/install-manifests/kubernetes/svc.yaml
Modify the database URL in deployment.yaml file. This file can be edited using a text editor like vi. For the purposes of this tutorial, the modification should look like this:
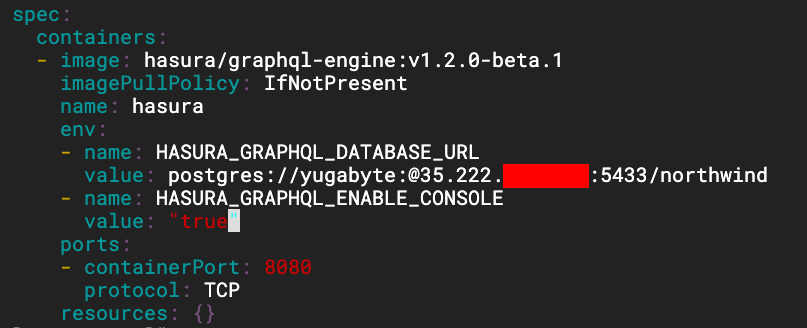
After saving the file use kubectl to create a Hasura deployment using the commands below:
$ kubectl create -f deployment.yaml

deployment.apps/hasura created

$ kubectl create -f svc.yaml

service/hasura created
To find the external IP and open the Hasura console execute the command below:
$ kubectl get svc

Now use https://<EXTERNAL-IP>/console to access the Hasura console. In this case it is 104.197.XX.XX. You should see the Hasura console as shown below:
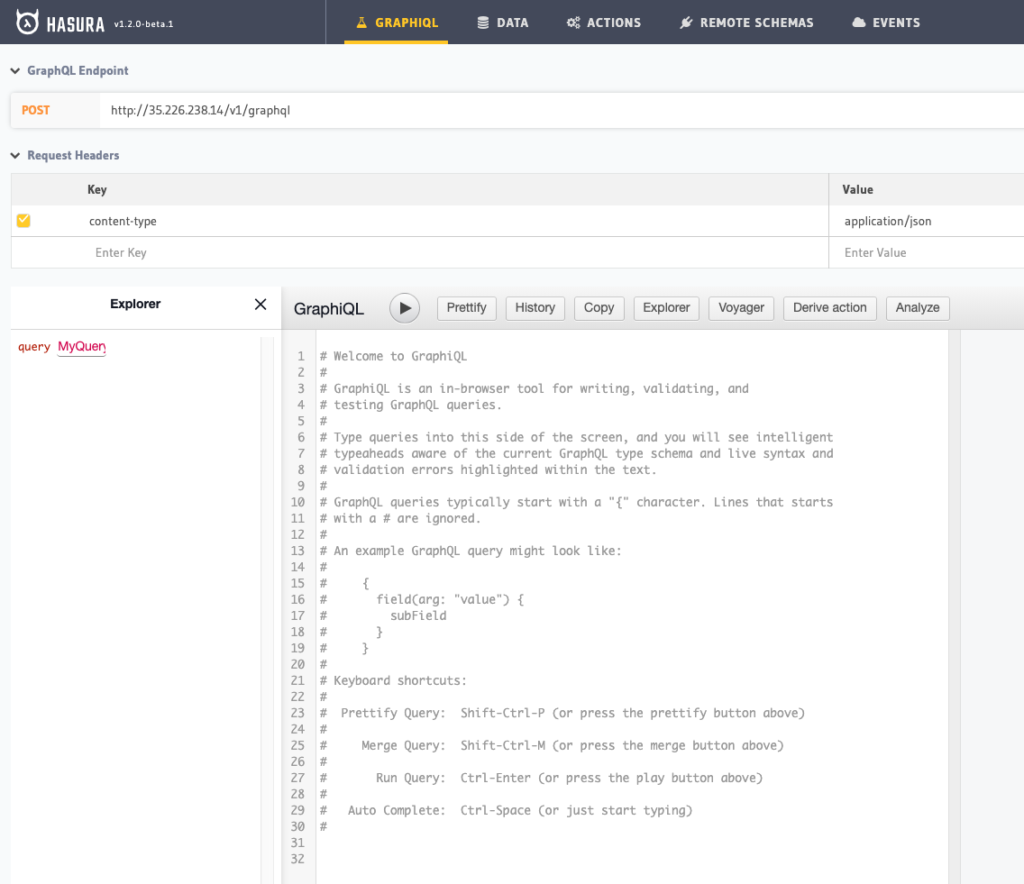
We are now ready to perform basic CRUD operations on the database using Hasura!
Querying data using Hasura
Click on Data in top nav, click on Track All for tables, views, and foreign key relations. Refresh your browser and you should now see the 14 northwind tables in the Explorer tree on the left-hand side when you click on GraphQL in the top nav.
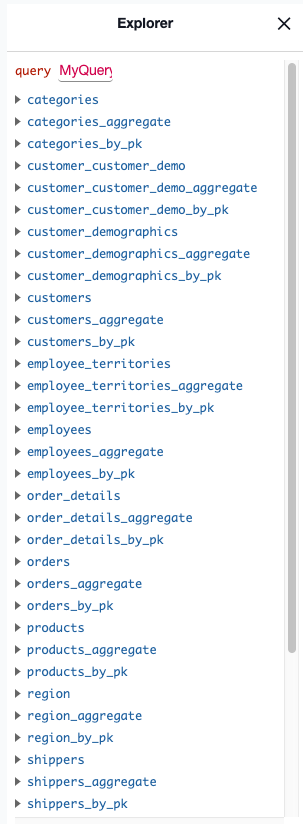
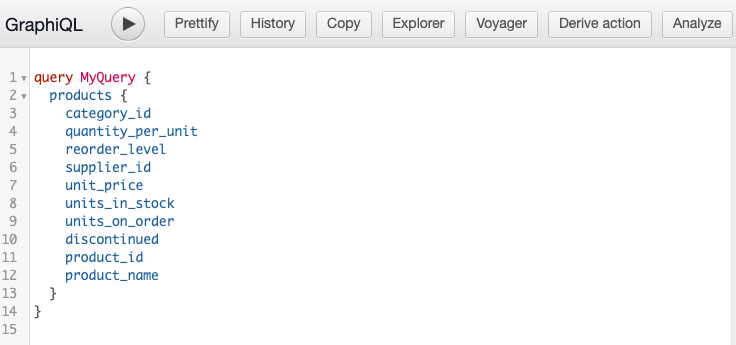
Next, select the table and the list of columns that you want to query. Hasura will automatically generate the query. In this example we’ll use the products table.
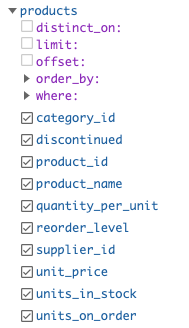
Now click the play button to run the query.
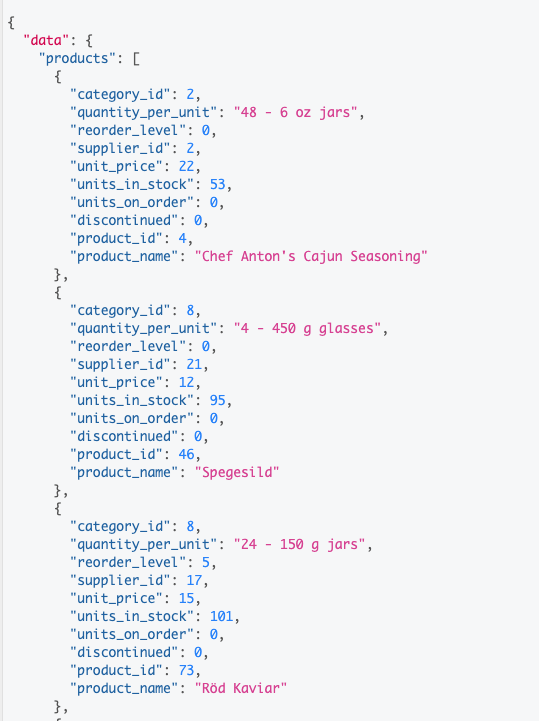
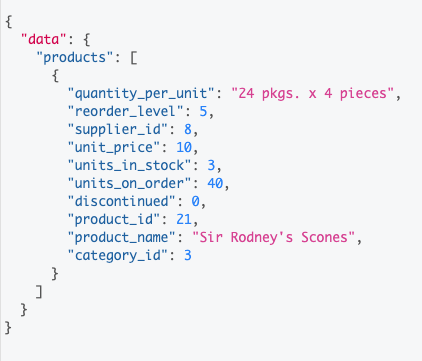
This will return all the entries in the products table. A sample of the output is below:
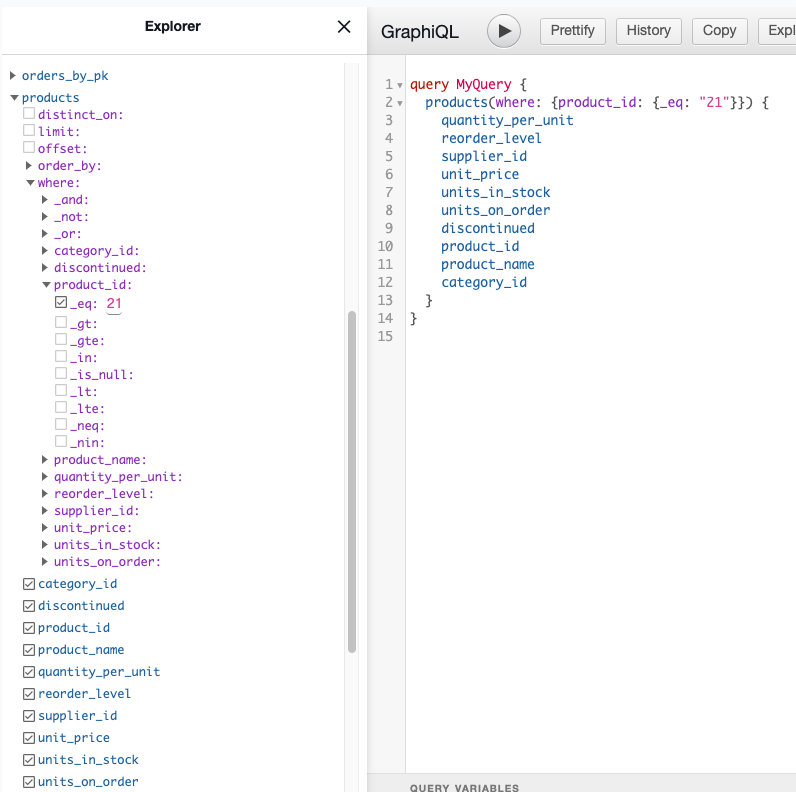
Query entries with a where clause
This time let’s include a where clause and return the product with the product_id equal to 21. In this case, we’ll click on where > product_id > _eq: and input 21.
Your output should look like this:
Adding a new entry
Click the ADD NEW MUTATION at the bottom of the explorer tree to find all the mutations available.

In this exercise, let’s add a new product. We can do this by selecting the following items in the explorer tree and inputing values for our new product, “Neal’s Greenies.”
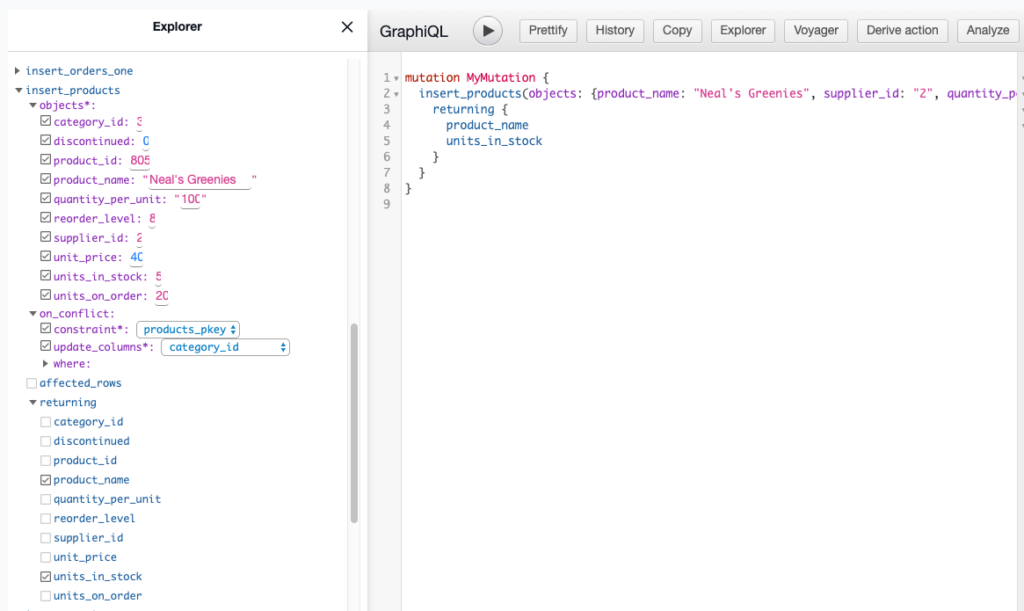
Click the play button. We selected to return the product_name and units_in_stock. So, the output after running the insert should look like this:

At this point we have successfully added a new entry. We can verify this by navigating to the Data tab and issuing a query like the one below:

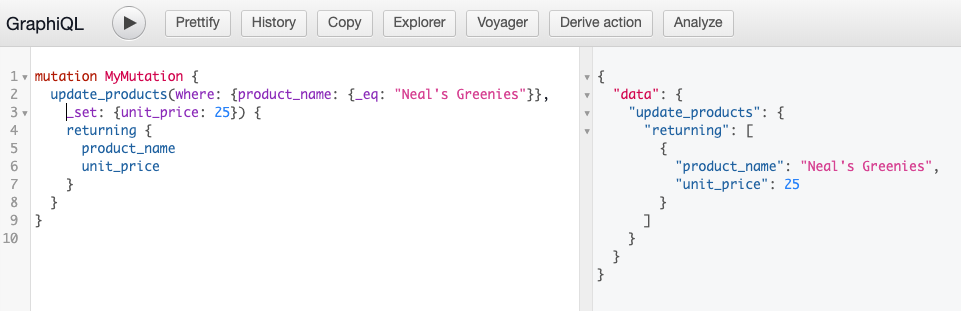
Updating an existing entry
Let’s change the unit_price for “Neal’s Greenies” from 40 to 25. The query and output should like this:
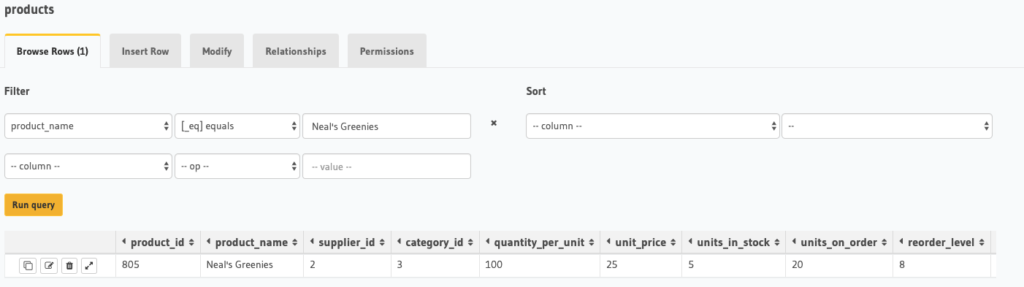
We can verify that the unit price has been changed to 25 by navigating to the Data tab and issuing a query like the one below:
Deleting an entry
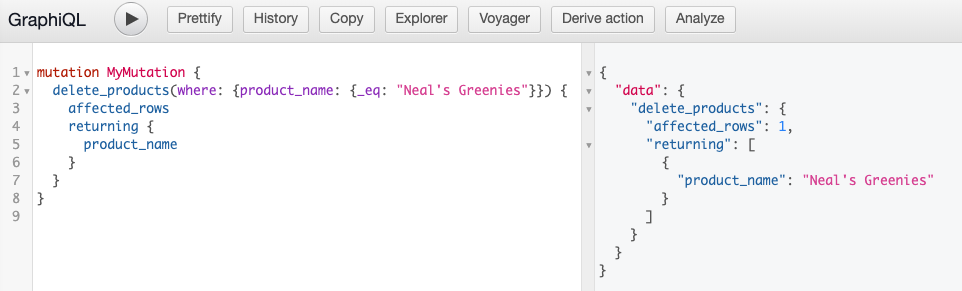
Deleting data is similar to how we constructed queries for the INSERT andUPDATE mutations. In this case, let’s DELETE the “Neal’s Greenies” product from the database by using delete_products in the explorer tree.
The query and output should like this:
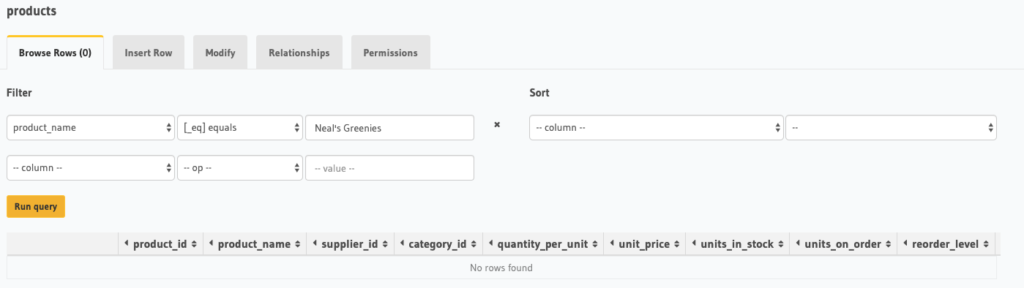
We can verify that “Neal’s Greenies” has been removed from the products table by navigating to the Data tab and issuing a query like the one below. You can see that we get “No rows found.”
That’s it! We’ve seen how easy it is to get YugabyteDB and Hasura up and running on GKE and to perform basic CRUD operations against the database with GraphQL. You are now ready to perform more advanced GraphQL operations against YugabyteDB with help from Hasura. Check out their docs and tutorials on how to get started.


