How to Implement Bitmap Scans on Distributed PostgreSQL
September 23, 2024
We’ve been working hard to bridge the performance gap between Postgres and our Postgres-compatible distributed database, YugabyteDB. We want to ensure that users have an optimum experience using Yugabyte out of the box, allowing them to take their existing Postgres apps and run them on YugabyteDB without changes. Discover more in our recent blog HERE.
A key part of this effort is providing support for bitmap scans, a scan type that combines multiple indexes. Without bitmap scans, queries with OR clauses needed to be either rewritten to use a UNION, (which is not always possible), or they would perform a full table scan, which increases latency and lowers throughput.
Nearly every app has a query that could benefit from a bitmap scan, so it’s an important feature. We decided to adapt bitmap scans to work in a distributed SQL environment.
Although YugabyteDB is forked from the Postgres code base, it can’t just use Postgres bitmap scans out of the box. Our storage layer is completely different, which changes the underlying data structures required for a bitmap scan. Postgres bitmap scans are based on blocks and pages, concepts that don’t neatly map to our LSM-based storage. In a distributed database, there are more network hops to account for – which opens possibilities to apply existing YugabyteDB optimizations to new areas in bitmap scans, but also requires different query plans to PostgreSQL.
Bitmap scans were really interesting to implement. These are some of my highlights:
- Although bitmap scans are still in progress, they’ve already helped multiple customers complete testing and migration to YugabyteDB, avoiding the need to rewrite queries.
- Bitmap scans can offer infinite performance improvements! Run time can decrease from O(n) to O(log(n)).
- Because YugabyteDB is distributed, there are unique performance improvements we can make. Remote filters and pushdowns allow us to outperform Postgres in some scenarios!
In this blog, I discuss:
- The high level strategy of bitmap scans
- How Postgres implements bitmap scans
- How we’ve adapted bitmap scans to work for YugabyteDB
- Areas where YugabyteDB bitmap scans go beyond vanilla Postgres
What is a Bitmap Scan?
In PostgreSQL, a typical index scan works by first accessing the index to find row IDs (called tuple IDs or TIDs) that satisfy the search condition. The scan then immediately goes to the main table to get the row. It repeats this for every row ID, satisfying the search criteria.
Bitmap scans significantly reduce the number of random lookups to the main table by building a bitmap (an ordered set) of all the row IDs and then iterating through the main table in one go. Bitmap scans also have BitmapAnd and BitmapOr nodes, that allow multiple bitmaps of row IDs (called a TIDBitmap) to be intersected or unioned with each other.
Take a look at a simple example below to show how this works in practice. We’ll look at an example listing several movies, with an index on their rating and an index on their director.
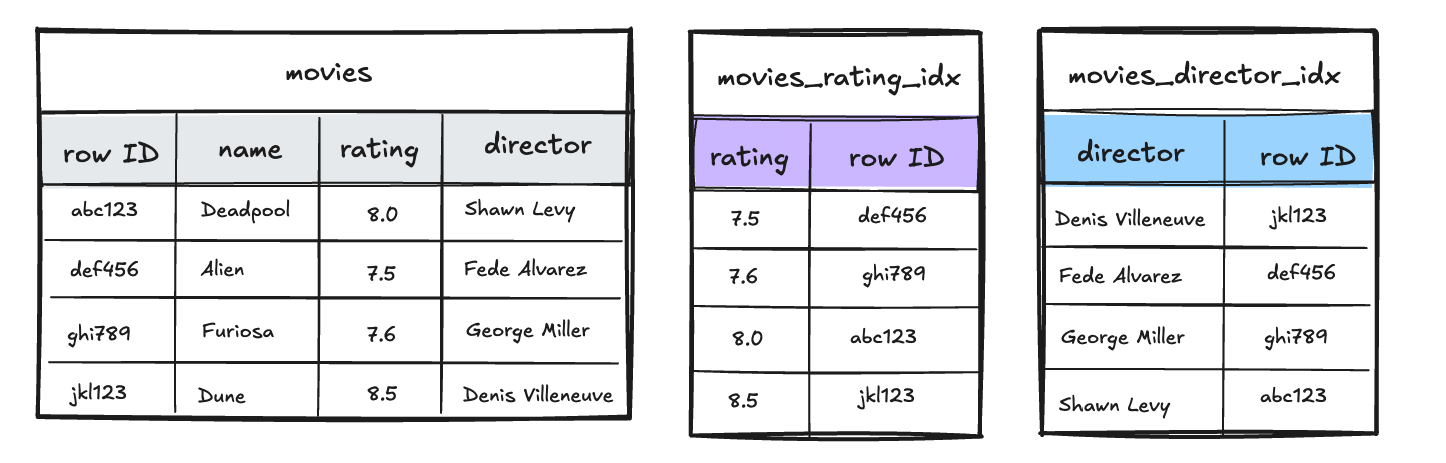
First we run the following query as a bitmap scan:
SELECT * FROM movies WHERE rating = 8.0 OR director ILIKE 'george%';
The planner determines that the rating condition can be answered efficiently by the rating index, and the director condition by the director index. So, a request is sent to each index to return the row IDs matching the condition.
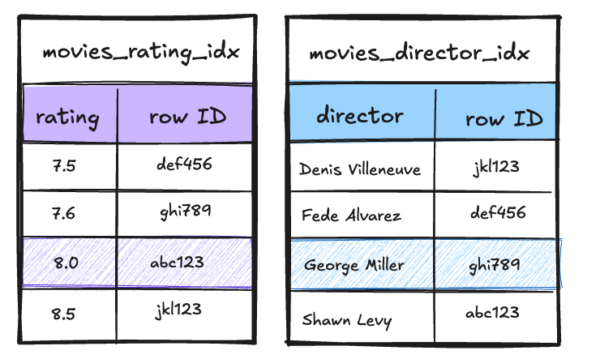
The retrieved row IDs are inserted into a bitmap set for each index.
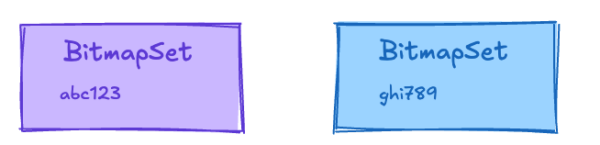
Since the two conditions are connected by an OR clause, we union the two bitmap sets to get one final bitmap set.

Finally, this set is used to look up the rows from the main table.
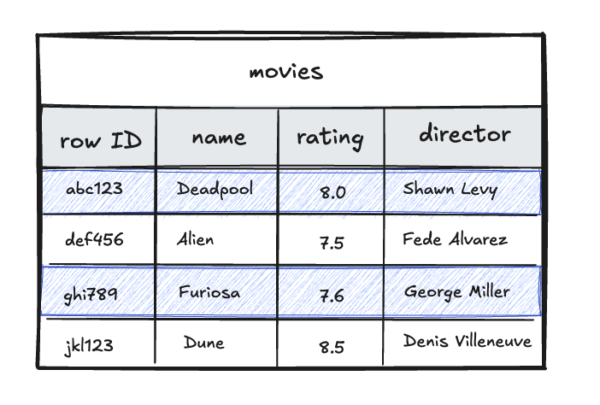
Bitmap scans allow us to combine multiple indexes to come up with an efficient execution plan for queries with ORs or ANDs.
Let’s look at this example in practice, using a YugabyteDB instance.
As you see throughout this article, YugabyteDB reuses the bitmap scans of Postgres, with the required modifications at the storage level. First, the code snippet below creates a table of movies, uses the generate_series function to insert 1 million random records, and creates several secondary indexes.
create table movies(name text, release_date date, genre text, rating float, director text);

insert into movies select
    substr(md5(random()::text), 1, 5),
    current_date - (random() * interval '40 years'),
    case when random() < 0.5 then 'comedy' else 'action' end,
    random() * random() * 10,
    substr(md5(random()::text), 1, 4) from generate_series(1, 1000000);

create index on movies(release_date ASC) include (name);
create index on movies(rating ASC) include (name);
create index on movies(director, genre) include (name);
What movie should we watch next? Let’s apply some filters to find some good movies.
We can use the indexes to quickly find the highest rated movies:
explain (analyze, dist, costs off, timing off, summary off)
select name from movies where rating > 9.9;
                                   QUERY PLAN
---------------------------------------------------------------------------------
 Index Only Scan using movies_rating_name_idx on movies (actual rows=55 loops=1)
   Index Cond: (rating > '9.9'::double precision)
   Heap Fetches: 0
   Storage Index Read Requests: 1
   Storage Index Rows Scanned: 55
 Execution Time: 0.589 ms
(6 rows)
In this explain plan, we see an Index Only Scan. The index contained all the information we were looking for (ordered by rating and including name), so we didn’t have to access the main table at all.
We can also find the highest-rated movies released in June 2024:
explain (analyze, dist, costs off, timing off, summary off)
select name from movies where (release_date between date 'june 1, 2024' and date 'june 30, 2024') and rating > 9;
                                            QUERY PLAN
---------------------------------------------------------------------------------------------------
 Index Scan using movies_release_date_name_idx on movies (actual rows=10 loops=1)
   Index Cond: ((release_date >= '2024-06-01'::date) AND (release_date <= '2024-06-30'::date))
   Storage Filter: (rating > '9'::double precision)
   Storage Table Read Requests: 3
   Storage Table Rows Scanned: 2053
   Storage Index Read Requests: 3
   Storage Index Rows Scanned: 2053
 Execution Time: 9.773 ms
(8 rows)
This above plan shows an Index Scan. We need to check conditions on rating and release_date, but we do not have an index that contains both of those fields.
- The query layer (Postgres backend) sent a request to the index on the storage layer for rows matching the release_date condition, and received tuple IDs in response. Although the Index Cond field does not explicitly say it, the index condition is evaluated fully on the storage layer.
- The tuple IDs are sent to the storage layer, where we scan the main table and apply the Storage Filter, rating >= 9. Only rows matching the filter will be returned to the query layer.
- The query layer receives the final results and outputs them to the user.
Remote filters allow for efficient execution of additional AND filters, even if they’re not indexed.
But, if we want to know about good recent movies from June OR highly rated movies, we can’t use an index scan. Let’s turn the bitmap scan off and take a look at the execution plan.
Remote filters allow for efficient execution of additional AND filters, even if they’re not indexed.
But, if we want to know about good recent movies from June OR highly rated movies, we can’t use an index scan. Let’s turn the bitmap scan off and take a look at the execution plan.
/*+ Set(enable_bitmapscan off) */ explain (analyze, dist, costs off, timing off)
select name from movies where (rating > 9 and release_date between date 'june 1, 2024' and date 'june 30, 2024') or rating > 9.9;

                                                                                   QUERY PLAN
--------------------------------------------------------------------------------------------------------------------------------------------------------------------------------
 Seq Scan on movies (actual rows=60 loops=1)
   Storage Filter: (((rating > '9'::double precision) AND (release_date >= '2024-06-01'::date) AND (release_date <= '2024-06-30'::date)) OR (rating > '9.9'::double precision))
   Storage Table Read Requests: 1
   Storage Table Rows Scanned: 1000000
 Execution Time: 486.486 ms
(5 rows)
Although we only sent one request, we had to read through all 1000000 rows. The good news is that in YugabyteDB 2.18+ this scan happens at the storage layer without the need to move data to the query layer (Postgres).
Now, if we take the /*+ Set(enable_bitmapscan off) */ hint away from the execution plan, we’ll see that bitmap scans allow us to significantly boost the original query, with no rewriting required!
explain (analyze, dist, costs off, timing off)
select name from movies where (rating > 9 and release_date between date 'june 1, 2024' and date 'june 30, 2024') or rating > 9.9;
                                                                                   QUERY PLAN
--------------------------------------------------------------------------------------------------------------------------------------------------------------------------------
 YB Bitmap Table Scan on movies (actual rows=60 loops=1)
   Storage Filter: (((rating > '9'::double precision) AND (release_date >= '2024-06-01'::date) AND (release_date <= '2024-06-30'::date)) OR (rating > '9.9'::double precision))
   Storage Table Read Requests: 3
   Storage Table Rows Scanned: 2103
   ->  BitmapOr (actual rows=2103 loops=1)
         ->  Bitmap Index Scan on movies_release_date_name_idx (actual rows=2053 loops=1)
               Index Cond: ((release_date >= '2024-06-01'::date) AND (release_date <= '2024-06-30'::date))
               Storage Index Read Requests: 1
               Storage Index Rows Scanned: 2053
         ->  Bitmap Index Scan on movies_rating_name_idx (actual rows=50 loops=1)
               Index Cond: (rating > '9.9'::double precision)
               Storage Index Read Requests: 1
               Storage Index Rows Scanned: 50
 Execution Time: 11.153 ms
(12 rows)
In this plan, we combine two Index Scans:
movies_release_date_rating_name_idxmovies_rating_idx
Each produces a set of tuple IDs that is unioned together in the BitmapOr plan node. Then the YB Bitmap Table Scan node queries the main table for the rows corresponding to the tuple IDs.
Instead of taking 500ms to scan the whole table, with the bitmap scan we spent 11ms using the appropriate indexes and looking up the exact rows from the main table!
How do Bitmap Scans Work on Postgres?
Now that we have a good understanding of what a bitmap scan is and how they work in practice, let’s explore internals of the implementation in Postgres.
Bitmap Scan Plan Nodes
Each of the plans above are combinations of plan nodes. Postgres bitmap scans are a combination of 4 different plan nodes:
- 1 Bitmap Heap Scan (equivalently called YB Bitmap Table Scan on Yugabyte, this plan node consumes a TIDBitmap, uses it to request rows from the main table, and applies any remaining filters).
- 0+ BitmapOr (this plan node unions multiple bitmaps with each other and produces one single TIDBitmap)
- 0+ BitmapAnd (this plan node intersects multiple TIDBitmaps with each other and produces one single TIDBitmap)
- 1+ Bitmap Index Scans (this plan node collects tuple IDs from an index and produces a TIDBitmap)
A BitmapOr or BitmapAnd node can have any number of Bitmap Index Scan nodes, BitmapOr nodes, or BitmapAnd nodes as children. Each of these nodes creates a TIDBitmap to pass up to its parent.
What is a TIDBitmap?
The full definition of a TIDBitmap can be found here.
The Postgres description:
bitmap data structures that are spiritually similar to Bitmapsets, but are specially adapted to store sets of tuple identifiers (TIDs), or ItemPointers. In particular, the division of an ItemPointer into BlockNumber and OffsetNumber is catered for.
The ItemPointer is a key part here. In Postgres, a TID is an ItemPointer, consisting of a block number and an offset. The block identifies the page, and the offset identifies where the tuple lies on a page.
The image in the introduction of this article is a bit of a simplification. Postgres has the ability to identify specific offsets within a page so that no extra data has to be read.
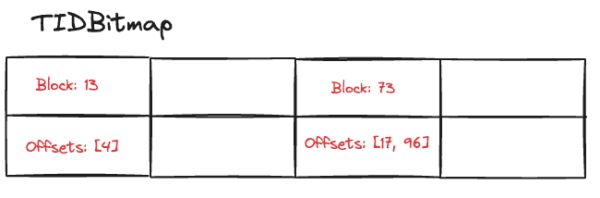
A TIDBitmap is a hash table of PageTableEntries. Each PageTableEntry represents a block, and contains a bitmap set of offsets. It’s a very space efficient data structure, and union and intersection operations can easily work with this data structure.
For instance, imagine that we’re doing a bitmap scan over the movie_rating_idx. We’ve found ItemPointer(13, 4), ItemPointer(73, 17), and ItemPointer(73, 96) already.
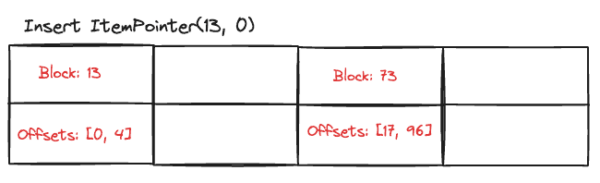
Then we find another record satisfying the search conditions in Block 13 offset 0. We insert this ItemPointer(13, 0) into the TIDBitmap, modifying an entry that already exists for block 13.
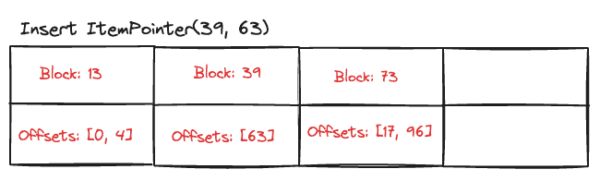
Then we find another record satisfying the search conditions in Block 39 offset 63. We do not yet have an entry for block 39, so we create a new entry.
What happens when our hash table fills up?
Sometimes the Bitmap Heap Scan node might have a line of output: Heap Blocks: exact=xxx lossy=yyyy. This occurs when there are too many exact PageTableEntries, so some memory was saved by combining them into lossy entries. Let’s examine exactly how this works. Consider a TIDBitmap that is already full:
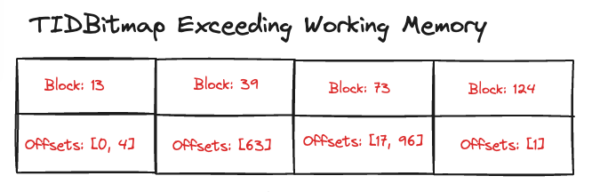
Before we can insert an ItemPointer(46, 17) in the above TIDBitmap, we need to clear up some space!
We’ll use a chunk size of 50 blocks, and iterate through the map. If we find any exact blocks that are within the page chunk, we will create a new lossy block that represents a chunk of pages. In the above example, block 13 and block 39 both fit into the 0-50 chunk, so we’ll combine those into one lossy entry.
Previously, the entries of the map represented exact entries, specifying a page and offsets within the page. Now, Postgres will repurpose an entry to indicate a lossy entry. The block number will represent the first page of the chunk, and the offsets will now identify the pages within the range. Our chunk covers pages 0-50, so the block number in this entry is 0. The pages that had entries on them were 13 and 39, so we mark those down as offsets.
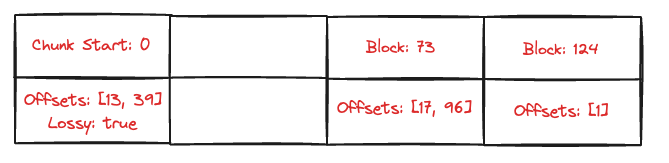
The above TIDBitmap represents:
- Page 0 + 13 needs to be fetched in its entirety
- Page 0 + 39 needs to be fetched in its entirety
- Page 73 needs rows 17 and 96 fetched
- Page 124 needs row 1 fetched
We lost our exact offset information for page 13 and 39, which means we’ll have to fetch the entire page for each of the pages identified by the lossy block.
We can still insert into a lossified TIDBitmap. If the new entry is to be inserted into a lossy PageTableEntry, we will only be able to record the page number, and the offset information will be dropped.

Bitmap Heap Scans
Once the final TIDBitmap is created, all of the Bitmap Index Scans, BitmapOrs, and BitmapAnds have been dealt with. The final step is the Bitmap Heap Scan, where Postgres collects the rows from the main table and applies any remaining filters.
Since a TIDBitmap holds all of the TIDs in sorted order, it’s a very efficient mechanism to retrieve rows and pages from the main table. It never accesses a page it doesn’t need to, and only accesses each page once.
Planning Bitmap Scans
If the planner estimates that there will be more entries than can fit into work_mem, the planner guesses the fraction of the PageTableEntries that will be lossy. It estimates that the number of tuples fetched will be (selectivity * fraction_exact_pages * n_tuples) + (fraction_lossy_pages * n_tuples). This means we will select only the tuples that match the conditions from the exact pages, but we’ll fetch all of the tuples from each of the lossy pages.
If fewer tuples are required, fewer pages will be fetched, and so access costs are similar to random access costs. As the number of pages fetched increases, access costs approach sequential costs.
This explains an interesting pattern on Postgres, where a query with only one condition might use a Bitmap Index Scan because the almost sequential access patterns of bitmap scans are beneficial. If the query selects fewer rows, it’s more likely to choose an Index Scan. If it selects more rows, it’s more likely to choose a Sequential Scan. Somewhere in between, it will use a bitmap scan. This is due to Postgres’s disk access cost modeling.
What Needs to Change to Support Bitmap Scans on Distributed PostgreSQL?
Since YugabyteDB is forked from Postgres, we have the framework of bitmap scans already in the code base. Temp tables in YugabyteDB are implemented as vanilla Postgres tables, so bitmap scans still work on temp tables in YugabyteDB.
But, how do we support bitmap scans for distributed tables?
Data Structure
The biggest obstacle for bitmap scans on YugabyteDB is that our tuple ID is different. A (page, offset) TID works for a single-node database, but not for a distributed system.
In YugabyteDB, the tuple ID is called a YBCTID. More information on YBCTIDs is available in the docs, but on the Postgres layer it’s represented as a binary string, with no equivalent ideas of a page or offset. Since the YBCTID received from DocDB doesn’t mean anything to the Postgres backend, we can’t store it as efficiently as Postgres can store their TIDs, and we can’t scan the main table sequentially.
We need a new data structure with fast inserts and fast unions and intersections. The data structure does not need to provide an ordered iteration, because the order is not meaningful locally.
YugabyteDB’s YbTIDBitmap uses a standard unordered set. Unions and intersections run in linear time and insertion is constant. Since this is encapsulated in the YbTIDBitmap object in the Postgres layer, callers don’t need to be aware of the difference between implementations and so much of the Postgres / YugabyteDB code can stay the same.
Below is an image of the overall flow of a YugabyteDB bitmap scan:
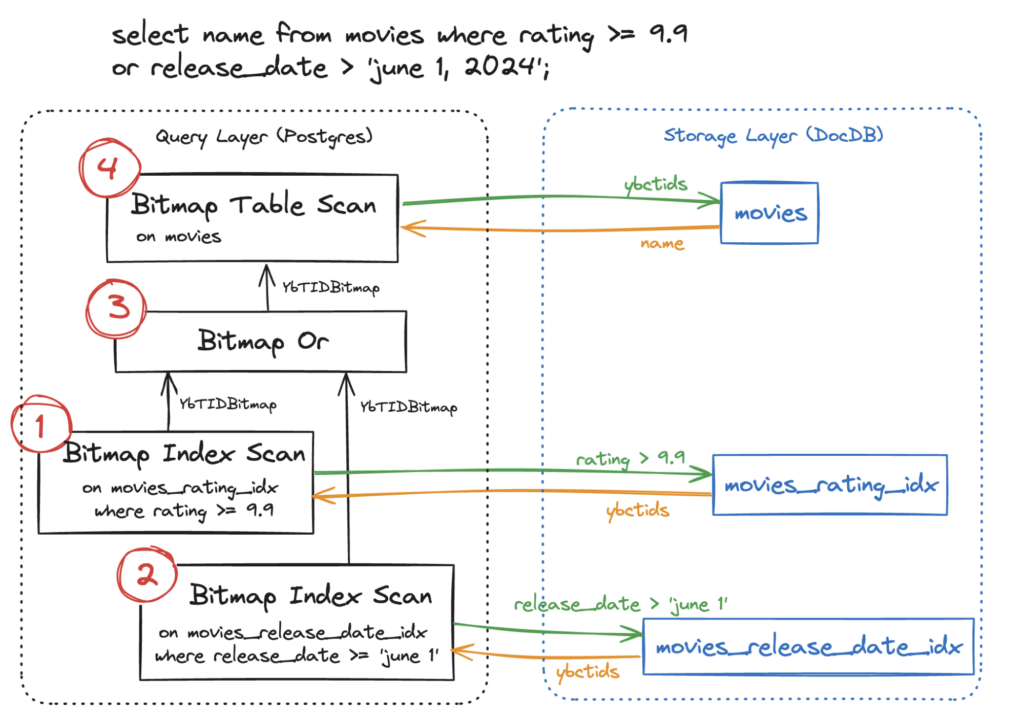
Bitmap Index Scans send a request to the storage layer for ybctids, and insert those into a YbTIDBitmap on the query layer that is passed up through the plan tree.
Exceeding work_mem
When the bitmap exceeds work_mem, Postgres handles it in a relatively efficient way, by selectively identifying the pages that need to be fully fetched.
Since the data structure is very different, YugabyteDB’s method of handling bloated bitmaps also needs to be different. This is tracked by #20576, but in the meantime, it simply discards the bitmap and falls back to a sequential scan with remote filters.
How Can We Make Bitmap Scans on YugabyteDB Even Better?
Not much is required to get the basic functionality of bitmap scans working. However, there’s more we can do to take advantage of other enhancements we’ve made in YugabyteDB, and make distributed bitmap scans really shine.
Storage Filters
Storage filters are a key difference between Postgres and YugabyteDB.
Postgres Bitmap scans can filter out rows in two places:
- Index conditions on Bitmap Index Scans.
- Filters on Bitmap Heap Scans.
YugabyteDB stores the data on separate nodes (tservers), so it is not ideal to return more rows than necessary to the Postgres layer and filter the rows there. Instead, filters can be sent with the request and evaluated on the node that has the data, so only rows matching both the index conditions and the filters are sent back.
In an index scan, it looks like this:
explain (analyze, dist, costs off, timing off, summary off)
select name from movies where release_date >= date 'jan 1, 2024' and rating > 9;
                                 QUERY PLAN
----------------------------------------------------------------------------
 Index Scan using movies_rating_name_idx on movies (actual rows=53 loops=1)
   Index Cond: (rating > '9'::double precision)
   Storage Filter: (release_date >= '2024-01-01'::date)
   Storage Table Read Requests: 6
   Storage Table Rows Scanned: 5171
   Storage Index Read Requests: 6
   Storage Index Rows Scanned: 5171
(7 rows)
Bitmap scans on YugabyteDB support remote filters on both the Bitmap Index Scan and the YB Bitmap Table Scan.
- Index conditions on Bitmap Index Scans
- Remote filters on Bitmap Index Scans
- Remote filters on YB Bitmap Table Scans
- Local filters on YB Bitmap Table Scans
These extra filters provide more opportunities to filter out rows, so we can send less rows over the network, reducing network latency and memory usage.
Let’s look at an example where we can see more of these filter types applied by running the below query against both vanilla Postgres and YugabyteDB:
explain (analyze, timing off, costs off)
select name from movies
where ((release_date between 'june 1, 2024' and 'june 30, 2024') -- released in June
       and rating > 7
       and (extract(isodow from release_date) IN (0, 6)))        -- released on a weekend
      or
       rating > 9.9;
When this query is executed against Postgres, the plan will look as follows:
Bitmap Heap Scan on movies (actual rows=64 loops=1)
   Recheck Cond: (((release_date >= '2024-06-01') AND (release_date <= '2024-06-30') AND (rating > '7')) OR (rating > '9.9'))
   Filter: (((release_date >= '2024-06-01') AND (release_date <= '2024-06-30') AND (rating > '7') AND (date_part('isodow', (release_date)) = ANY ('{0,6}'))) OR (rating > '9.9'))
   Rows Removed by Filter: 82
   Heap Blocks: exact=145
   ->  BitmapOr (actual rows=0 loops=1)
         ->  BitmapAnd (actual rows=0 loops=1)
               ->  Bitmap Index Scan on movies_release_date_name_idx (actual rows=2077 loops=1)
                     Index Cond: ((release_date >= '2024-06-01') AND (release_date <= '2024-06-30'))
               ->  Bitmap Index Scan on movies_rating_name_idx (actual rows=50026 loops=1)
                     Index Cond: (rating > '7')
         ->  Bitmap Index Scan on movies_rating_name_idx (actual rows=49 loops=1)
               Index Cond: (rating > '9.9')
 Execution Time: 14.150 ms
(14 rows)
Postgres can only filter in the query layer itself, so the planner decided it was more efficient to create a BitmapAnd plan node to intersect the set of movies released in June with the set of movies rated above 7, rather than filtering the results in the Bitmap Heap Scan plan node.
Note some quirks with the Postgres plan:
- Recheck Cond is always printed, even if the condition is not actually rechecked. No rows were removed by the recheck condition, otherwise the plan would include “Rows Removed by Recheck: x”
- BitmapOr and BitmapAnd both display 0 rows. The TIDBitmap does not have an efficient way to count the number of entries, so Postgres just displays 0 for their counts.
When you execute the same query In YugabyteDB, the plan looks like:
YB Bitmap Table Scan on movies (actual rows=63 loops=1)
   Storage Filter: (((release_date >= '2024-06-01') AND (release_date <= '2024-06-30') AND (rating > '7') AND (date_part('isodow', (release_date)) = ANY ('{0,6}'))) OR (rating > '9.9'))
   ->  BitmapOr (actual rows=433 loops=1)
         ->  Bitmap Index Scan on movies_release_date_name_idx (actual rows=383 loops=1)
               Index Cond: ((release_date >= '2024-06-01') AND (release_date <= '2024-06-30'))
               Storage Index Filter: (date_part('isodow', (release_date)) = ANY ('{0,6}'))
         ->  Bitmap Index Scan on movies_rating_name_idx (actual rows=50 loops=1)
               Index Cond: (rating > '9.9')
 Execution Time: 4.618 ms
(9 rows)
Note two significant differences:
- We can push down the day of the week condition to the storage layer, as a Storage Index Filter! The planner decided that it was most efficient to have just two Bitmap Index Scans, one of which collects weekend releases in June, and the second which collects movies rated above 9.9.
- There is a Storage Filter in the YB Bitmap Table Scan node. This filter is responsible for ensuring that the movies released on June weekends also have a rating above 7.
If you compare the “Execution Time” for both vanilla Postgres and YugabyteDB, you’ll see that the storage filter pushdown gives a 3x speed up over vanilla Postgres!
Aggregate Pushdown
Simple aggregates on YugabyteDB do not require fetching all of the rows to the Postgres query layer and then computing the aggregate. Instead, we can pushdown the aggregate to the storage layer, compute the result on the storage layer, and then just send back the partial result. This saves a lot of network traffic.
Since bitmap scans are performed in phases, we still need to collect all the ybctids and perform set operations on them. Rows may be eliminated or double counted if we push the aggregate down through a BitmapAnd or BitmapOr node. But we can pushdown the aggregate on a YB Bitmap Table Scan node, even when there’s filters – as long as the filters can be pushed down to the storage layer with the aggregate.
Consider a query for the count of all the movies that are highly rated or released on June weekends:
explain (analyze, timing off, costs off)
select count(*) from movies
where ((release_date between 'june 1, 2024' and 'june 30, 2024') -- released in June
       and extract(isodow from release_date) IN (0, 6))          -- released on a weekend
      or
       rating > 9.9;
On Postgres, the query plan looks like:
Aggregate (actual rows=1 loops=1)
   ->  Bitmap Heap Scan on movies (actual rows=405 loops=1)
         Recheck Cond: (((release_date >= '2024-06-01') AND (release_date <= '2024-06-30')) OR (rating > '9.9'))
         Filter: (((release_date >= '2024-06-01') AND (release_date <= '2024-06-30') AND (date_part('isodow', (release_date)) = ANY ('{0,6}'))) OR (rating > '9.9'))
         Rows Removed by Filter: 1721
         Heap Blocks: exact=1896
         ->  BitmapOr (actual rows=0 loops=1)
               ->  Bitmap Index Scan on movies_release_date_name_idx (actual rows=2077 loops=1)
                     Index Cond: ((release_date >= '2024-06-01') AND (release_date <= '2024-06-30'))
               ->  Bitmap Index Scan on movies_rating_name_idx (actual rows=49 loops=1)
                     Index Cond: (rating > '9.9')
 Execution Time: 10.400 ms
(12 rows)
Since Postgres has a filter that must be evaluated at the query layer, it has to fetch all the rows, filter them, and then aggregate them,
On YugabyteDB, we can push down the aggregate:
Finalize Aggregate (actual rows=1 loops=1)
   ->  YB Bitmap Table Scan on movies (actual rows=1 loops=1)
         Storage Filter: (((release_date >= '2024-06-01') AND (release_date <= '2024-06-30') AND (date_part('isodow', (release_date)) = ANY ('{0,6}'))) OR (rating > '9.9'))
         Partial Aggregate: true
         ->  BitmapOr (actual rows=433 loops=1)
               ->  Bitmap Index Scan on movies_release_date_name_idx (actual rows=383 loops=1)
                     Index Cond: ((release_date >= '2024-06-01') AND (release_date <= '2024-06-30'))
                     Storage Index Filter: (date_part('isodow', (release_date)) = ANY ('{0,6}'))
               ->  Bitmap Index Scan on movies_rating_name_idx (actual rows=50 loops=1)
                     Index Cond: (rating > '9.9')
 Execution Time: 4.779 ms
(11 rows)
Storage index filters on the first Bitmap Index Scan allow us to identify fewer tuple IDs than Postgres. Our request to the main table has to return only an aggregate, not the rows themselves.
Aggregate pushdown in this case results in a 2x speedup over vanilla Postgres!
Bitmap Index Only Scans
Note: Bitmap Index Only Scans are currently under development, and tracked by #21144
An index only scan is an index scan that does not need to access the main table. All of the targeted columns are present in the index, whether they are the keys of the index or just included columns.
Similarly, a Bitmap Index Only Scan is a bitmap scan that can avoid accessing the main table. If all of the indexes contain the targeted columns, we can collect the ybctids and the column values from each index.
After all of the bitmap operations have completed, we extract tuples from the bitmap and return them without ever having to access the main table.
Next Steps
Bitmap scans in YugabyteDB will be ready for Early Access in YugabyteDB 2024.1.3. The outstanding work is tracked HERE.
To learn more about bitmap scans on YugabyteDB, join an upcoming Yugabyte Friday Tech Talk!


