Distributed SQL Tips and Tricks – April 3, 2020
Welcome to this week’s tips and tricks blog where we recap some distributed SQL questions from around the Internet. We’ll also review upcoming events, new documentation, and blogs that have been published since the last post. Got questions? Make sure to ask them on our YugabyteDB Slack channel, Forum, GitHub, or Stackoverflow. Ok, let’s dive right in:
How can I save the results of YSQL commands to a file?
It is often useful to save the results from ysqlsh queries to a file so they can be reviewed at a later time. This can be done easily by using the \o filename command. For example:
$ ./bin/ysqlsh
ysqlsh (11.2-YB-2.1.2.0-b0)
Type "help" for help.

yugabyte=# \o results.txt
yugabyte=# \l
yugabyte=# SELECT 1;
yugabyte=# \q
We can then read the generated file using the cat command:
$ cat results.txt
                               	List of databases
  	Name   	|  Owner   | Encoding | Collate |	Ctype	|   Access privileges
-----------------+----------+----------+---------+-------------+-----------------------
 postgres    	| postgres | UTF8 	| C   	| en_US.UTF-8 |
 system_platform | postgres | UTF8 	| C   	| en_US.UTF-8 |
 template0   	| postgres | UTF8 	| C   	| en_US.UTF-8 | =c/postgres      	+
             	|      	|      	|     	|         	| postgres=CTc/postgres
 template1   	| postgres | UTF8 	| C   	| en_US.UTF-8 | =c/postgres      	+
             	|      	|      	|     	|         	| postgres=CTc/postgres
 yb_demo     	| yugabyte | UTF8 	| C   	| en_US.UTF-8 | =Tc/yugabyte     	+
             	|      	|      	|     	|         	| yugabyte=CTc/yugabyte+
             	|      	|      	|     	|         	| user_read=c/yugabyte
 yugabyte    	| postgres | UTF8 	| C   	| en_US.UTF-8 |
(6 rows)

 ?column?
----------
    	1
(1 row)
How can I specify multiple hosts for the YSQL client to use?
The YSQL API is built on top of a PostgreSQL query layer and makes use of the same client drivers. Most PostgreSQL clients (including ysqlsh) are built on top of PostgreSQL’s libpq library which supports the ability to specify multiple hosts on connection settings. When done this way, each host will be tried in sequential order until a connection is successful. In the example below we see an example of this behavior on a cluster with 3 yb-tservers using ysqlsh.
First we create a cluster with replication factor 3:
$ ./bin/yb-ctl start --replication_factor 3
Creating cluster.
Waiting for cluster to be ready.
----------------------------------------------------------------------------------------------------
| Node Count: 3 | Replication Factor: 3                                                        	|
----------------------------------------------------------------------------------------------------
| JDBC            	: jdbc:postgresql://127.0.0.1:5433/postgres                              	|
| YSQL Shell      	: bin/ysqlsh                                                             	|
| YCQL Shell      	: bin/cqlsh                                                              	|
| YEDIS Shell     	: bin/redis-cli                                                          	|
| Web UI          	: https://127.0.0.1:7000/                                                 	|
| Cluster Data    	: /home/guru/yugabyte-data                                               	|

----------------------------------------------------------------------------------------------------

For more info, please use: yb-ctl status
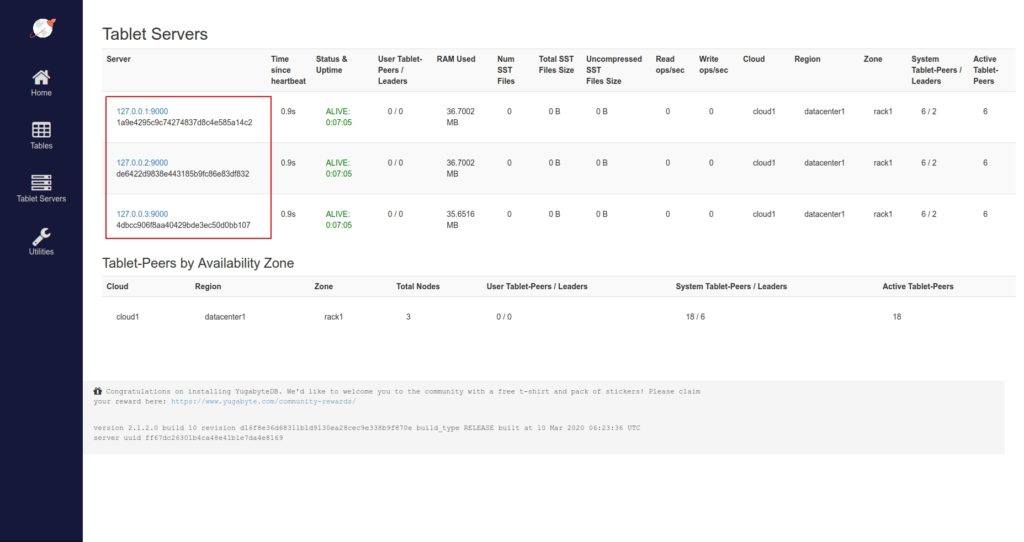
Looking at the https://127.0.0.1:7000/tablet-servers page, we see the IPs of the 3 processes:

We can see in the UI that the IPs of the YugabyteDB tablet servers are:
127.0.0.1:9000127.0.0.2:9000127.0.0.3:9000
Now, let’s test to see if we can successfully connect to the first host at 127.0.0.1:
$ ./bin/ysqlsh --host=127.0.0.1
ysqlsh (11.2-YB-2.1.2.0-b0)
Type "help" for help.

yugabyte=#
Now let’s find and kill the yb-tserver listening on 127.0.0.1:5433 by searching for its process id (PID) and then issuing a kill command:
$ ps aux | grep -i yb-tserver | grep -i 127.0.0.1:5433
guru  	2680  3.8  0.5 1193072 81732 pts/0   Sl   20:27   0:21 /home/guru/Desktop/yugabyte/yugabyte-2.1.2.0/bin/yb-tserver --fs_data_dirs /home/guru/yugabyte-data/node-1/disk-1 --webserver_interface 127.0.0.1 --rpc_bind_addresses 127.0.0.1 --v 0 --version_file_json_path=/home/guru/Desktop/yugabyte/yugabyte-2.1.2.0 --webserver_doc_root /home/guru/Desktop/yugabyte/yugabyte-2.1.2.0/www --tserver_master_addrs=127.0.0.1:7100,127.0.0.2:7100,127.0.0.3:7100 --yb_num_shards_per_tserver=2 --redis_proxy_bind_address=127.0.0.1:6379 --cql_proxy_bind_address=127.0.0.1:9042 --local_ip_for_outbound_sockets=127.0.0.1 --use_cassandra_authentication=false --ysql_num_shards_per_tserver=2 --enable_ysql=true --pgsql_proxy_bind_address=127.0.0.1:5433

$ kill -9 2680
$ ps aux | grep -i yb-tserver | grep -i 127.0.0.1:5433
After killing the process we are unable to connect to this tablet server:
$ ./bin/ysqlsh --host=127.0.0.1
ysqlsh: could not connect to server: Connection refused
    Is the server running on host "127.0.0.1" and accepting
    TCP/IP connections on port 5433?
Then we retry again by listing all hosts:
$ ./bin/ysqlsh --host=127.0.0.1,127.0.0.2,127.0.0.3
ysqlsh (11.2-YB-2.1.2.0-b0)
Type "help" for help.

yugabyte=#
The client fails to connect to the first host 127.0.0.1 and tries the next one until a connection is successful. In this case a successful connection was established on the tablet server running on 127.0.0.2.
When should I use yb-ctl? Can I use it to monitor the status of a cluster created using manual deployment?
yb-ctl is a CLI for creating and managing YugabyteDB clusters on a single local machine. Such local clusters are meant for development and functional testing purposes only. It internally orchestrates yb-tserver and yb-master servers for RF1 (default) and RF3 configurations.
For performance testing and production environments, a multi-node YugabyteDB cluster running on multiple host machines is needed. There are many different ways to deploy such clusters including the ability to deploy manually using the yb-tserver and yb-master servers directly. Once a multi-node cluster is created without using yb-ctl (using say the manual deployment approach), then that cluster cannot be monitored or managed with yb-ctl. In other words, yb-ctl and other deployment approaches cannot be mixed and matched.How can I extract the date (yyyy/mm/dd) from a timestamp using YSQL?
PostgreSQL and thus YSQL provide a vast array of functions to manipulate timestamps. A list with examples can be found on the PostgreSQL documentation site. A request that often comes up is extracting a date from a timestamp. This can be easily achieved by casting the timestamp column as a date:
yugabyte=# CREATE TABLE user_login(name TEXT, login_time TIMESTAMP);
CREATE TABLE
yugabyte=# SELECT name, login_time::date FROM user_login;
 name | login_time
------+------------
 john | 2019-11-11
 bill | 2020-10-22
 jane | 2020-04-01
(3 rows)
Looking a little deeper, we can see that Bill actually logged in from the future! We can also select only users that logged in from the future:
yugabyte=# SELECT name, login_time::date FROM user_login WHERE login_time > (now() at time zone 'utc');
 name | login_time
------+------------
 bill | 2020-10-22
(1 row)
In YugabyteDB, is there an equivalent to MySQL’s group_concat function?
MySQL provides a group_concat function which returns a string result with the concatenated non-NULL values from a group. The same results can be achieved by using the string_agg function available in YSQL as illustrated in the example below:
yugabyte=# CREATE TABLE student_grades(name TEXT, grade TEXT);
CREATE TABLE

yugabyte=# INSERT INTO student_grades(name,grade) VALUES ('bill', 'A'), ('john', 'B-'), ('bill', 'A'), ('john', 'C-'), ('jane', 'F');
INSERT 0 5

yugabyte=# SELECT name, string_agg(grade,',') AS grades FROM student_grades GROUP BY name ORDER BY name;

 name | grades
------+--------
 bill | A,A
 jane | F
 john | B-,C-
(3 rows)
In this example, the string_agg function helps easily identify the student with the worst grades.
New Blogs, Tutorials, and Videos
New Blogs
- Automating YugabyteDB Deployments with Google Cloud Deployment Manager
- Basic CRUD Operations Using Hasura GraphQL with Distributed SQL on GKE
- An Introduction to Distributed SQL: Glossary of Terms
New Videos
- Install YugabyteDB on macOS using Docker and yugabyted
- Longhorn Distributed Block Storage & Cloud Native Distributed SQL on Google Kubernetes Engine
- Getting Started with Distributed SQL Colocated Tables
Upcoming Events
- GraphQL Madrid Meetup, April 9, 2020 at 8 am PT [15:00 UTC]
- Kubernetes Master Class: Getting Started with Longhorn Distributed Block Storage and Cloud-Native Distributed SQL, April 22, 2020 at 8 am PT [15:00 UTC]
- Virtual Silicon Valley PostgreSQL Meetup, April 23, 2020 at 11 am PT [18:00 UTC]
Get Started
Ready to start exploring YugabyteDB features? Getting up and running locally on your laptop is fast. Visit our quickstart page to get started.


