Using GORM with YugabyteDB
GORM is an Object Relational Mapping (ORM) library for Golang. ORM converts data between incompatible type systems using object-oriented programming languages. An ORM library is a library that implements this technique and provides an object-oriented layer between relational databases and object-oriented programming languages.
In this blog post, we’ll show you how to:
- Start a YugabyteDB cluster on your local Engine.
- Download GORM and configure the sample project.
- Create a simple Go application to run GORM with YugabyteDB.
New to distributed SQL or YugabyteDB? Read on.
What is Distributed SQL?
Distributed SQL databases are becoming popular with organizations interested in moving data infrastructure to the cloud or cloud native environments. This is often motivated by the desire to reduce TCO or move away from the horizontal scaling limitations of monolithic RDBMS like Oracle, PostgreSQL, MySQL, and SQL Server. The basic characteristics of Distributed SQL are:
- They must have a SQL API for querying and modeling data, with support for traditional RDBMS features like foreign keys, partial indexes, stored procedures, and triggers.
- Automatic distributed query execution so that no single node becomes a bottleneck.
- Should support automatic and transparent distributed data storage. This includes indexes, which should be sharded across multiple nodes of the cluster so that no single node becomes a bottleneck. Data distribution ensures high performance and high availability.
- Distributed SQL systems should also provide for strongly consistent replication and distributed ACID transactions.
For more details, check out “What is Distributed SQL?”
What is YugabyteDB?
YugabyteDB is an open source, high-performance distributed SQL database built on a scalable and fault-tolerant design inspired by Google Spanner. YugabyteDB is PostgreSQL code compatible, cloud native, and offers deep integration with GraphQL projects. It also supports advanced RDBMS features like stored procedures, triggers, and UDFs.
Ok, now let’s get into the example application.
Starting a YugabyteDB cluster
For starters, install YugabyteDB 2.6 or later on your machine, if it isn’t already installed. To do this, follow the steps mentioned on this page.
- To create a single-node local cluster with a replication factor (RF) of 1, run the following command:
$ ./bin/yugabyted start
- Check the cluster status by running the following command:
$ ./bin/yugabyted status
We’ll be working with the default “yugabyte” database. In case you want to work with another database, create it by running this command in ysqlsh:
CREATE DATABASE <database_name>;
\c <database_name>;
Once the cluster is up and running, we can proceed to the next step of setting up GORM and the demo project.
Downloading GORM and configuring the sample project
- First, download and install Golang for your system. The latest releases are available on the Go Downloads page.
- Next, create a working directory by running the following command:
mkdir Demo-Gorm && cd Demo-Gorm
- Check the GOPATH value by running the following command:
$ echo $GOPATH
If your GOPATH is not the absolute path to your working directory, set it to that.
$ export GOPATH=/Path/to/Working/directory
- Once the GOPATH is set, install the required components by running the following in a command prompt:
$ go get github.com/lib/pq

$ go get github.com/jinzhu/gorm

$ go get github.com/jinzhu/gorm/dialects/postgres
This will conclude the setting up of your sample project and now we can start writing code.
Using GORM through the Go code
Create a file main.go and add the following code in it. In this example, we will create a table Employee with columns: Id, name, age, and language and then insert two rows of data into the table. We will then query the Employee table to verify the previously inserted data.
package main


import (

   "fmt"

   "github.com/jinzhu/gorm"
   _ "github.com/jinzhu/gorm/dialects/postgres"

)


type Employee struct {

   Id       int64  `gorm:"primary_key"`
   Name     string `gorm:"size:255"`
   Age      int64
   Language string `gorm:"size:255"`

}


const (

   host     = "localhost"
   port     = 5433
   user     = "yugabyte"
   password = "yugabyte"
   dbname   = "yugabyte"

)


var db *gorm.DB


func main() {

   conn := fmt.Sprintf("host= %s port = %d user = %s password = %s dbname = %s sslmode=disable", host, port, user, password, dbname)
   var err error
   db, err = gorm.Open("postgres", conn)
   if err != nil {
       panic(err)

   }

   defer db.Close()


   // Create Table
   db.Debug().AutoMigrate(&Employee{})


   // Insert Value
   db.Create(&Employee{Id: 1, Name: "John", Age: 35, Language: "Golang-GORM"})
   db.Create(&Employee{Id: 2, Name: "Smith", Age: 24, Language: "Golang-GORM"})


   // Display the input data
   var employees []Employee
   db.Find(&employees)
   for _, employee := range employees {
       fmt.Printf("Employee ID:%d\nName:%s\nAge:%d\nLanguage:%s\n", employee.Id, employee.Name, employee.Age, employee.Language)
       fmt.Printf("--------------------------------------------------------------\n")

   }

}
Once completed, run the code with the following command:
$ go run main.go
On successful completion, you should be able to see the following in your terminal:

Verifying the results
Finally, you can verify the code execution by looking for the changes inside the database. Follow the below steps for that:
- First, go to your YugabyteDB installation directory. For example:
cd /path-to-yugabytedb
- Now run the ysqlsh client:
./bin/ysqlsh
- Next, list all the tables inside the database:
\dt
- Then check if the rows are inserted into the table:
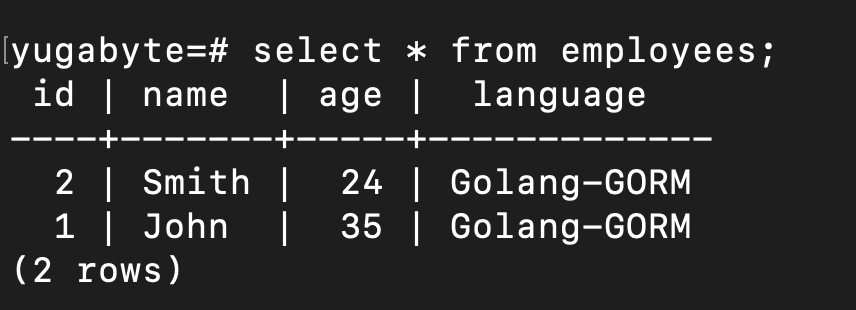
Select * from employees;
This will display the records as follows:

Got questions? Join the YugabyteDB community Slack channel for a deeper discussion with over 5,500 developers, engineers, and architects.


