YugabyteDB on OKE (Oracle Cloud Kubernetes)
We have documented how to install YugabyteDB on the main cloud providers (https://docs.yugabyte.com/preview/deploy/public-clouds/). And when I joined Yugabyte, many friends from the oracle community asked me about the Oracle Cloud (OCI).
In the Oracle Cloud there are 2 ways to run containers:
- Do-It-Yourself with IaaS (Infrastructure as a Service)
Obviously, you can provision some compute instances (and network and storage) running Docker and install Kubernetes (or other orchestration). Oracle provides a Terraform installer for that: https://github.com/oracle/terraform-kubernetes-installer. - Managed with OKE (OCI Container Engine for Kubernetes) to deploy Kubernetes quickly, upgrade easily… The Registry (OCIR) and Kubernetes Engine (OKE) are free. We pay only for the resources (compute instances, storage, load balancers).
Developer Services Console
I’ll use the managed one here, OKE. The Kubernetes service is found in the OCI menu under Developer Services. Then in Containers & Artifacts click on Kubernetes Clusters (OKE).
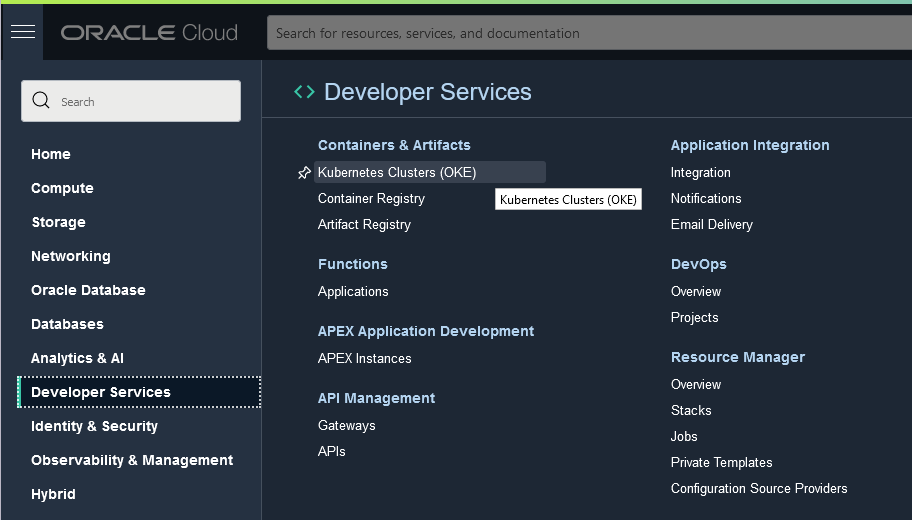
You can also access it directly with: https://cloud.oracle.com/containers/clusters and choosing your region. In Oracle Cloud, the price does not depend on the region, so latency with users is the main criteria. This can also be Cloud@Customer where the managed service runs on your data center.
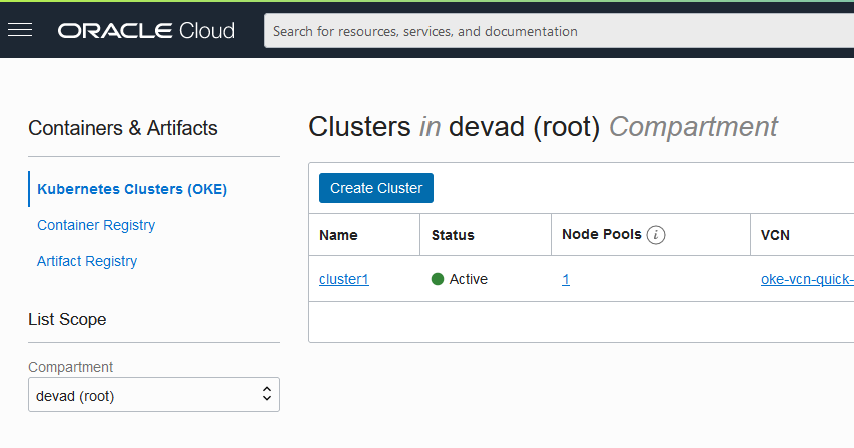
This is where you can see your K8s clusters.
I’ll choose the Quick Create wizard here.
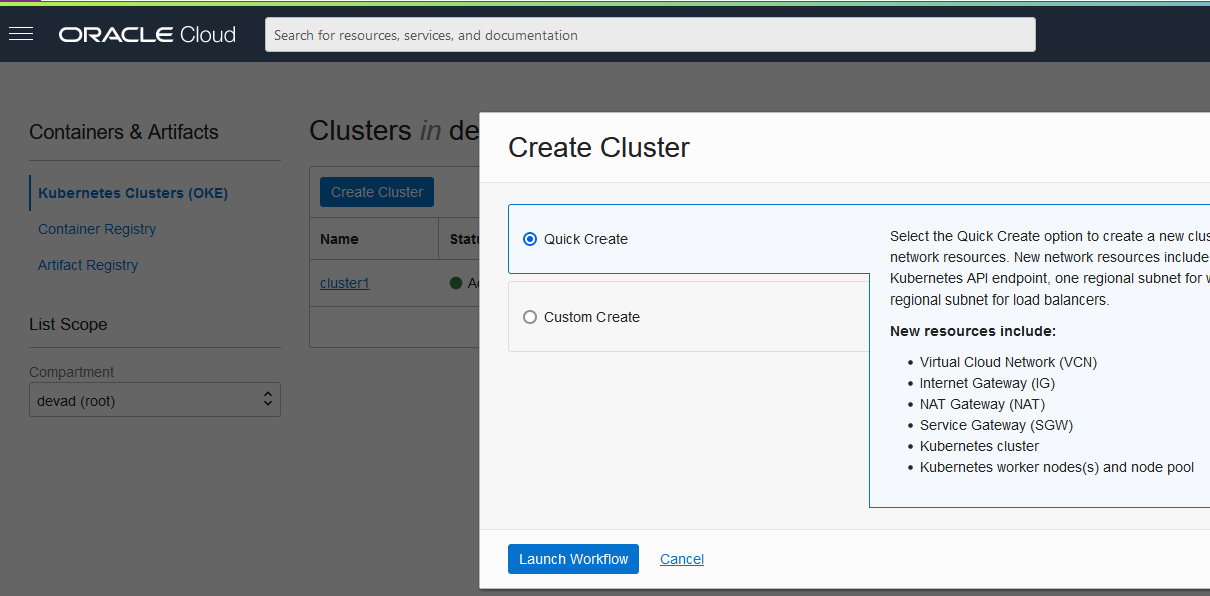
The main information to provide is:
- The name of the cluster
- The version of Kubernetes to run on the master node
This setup will create:
- A VCN, with NAT, Internet and Service Gateways
- 3 subnets (one private for the worker nodes, and the other public as I keep the default “public workers” for this demo)
- 2 Load Balancers (for master and tserver), with their security lists
- The worker nodes and API endpoint
I’m using public endpoints here because this is a lab, but obviously you put your database on a private subnet.
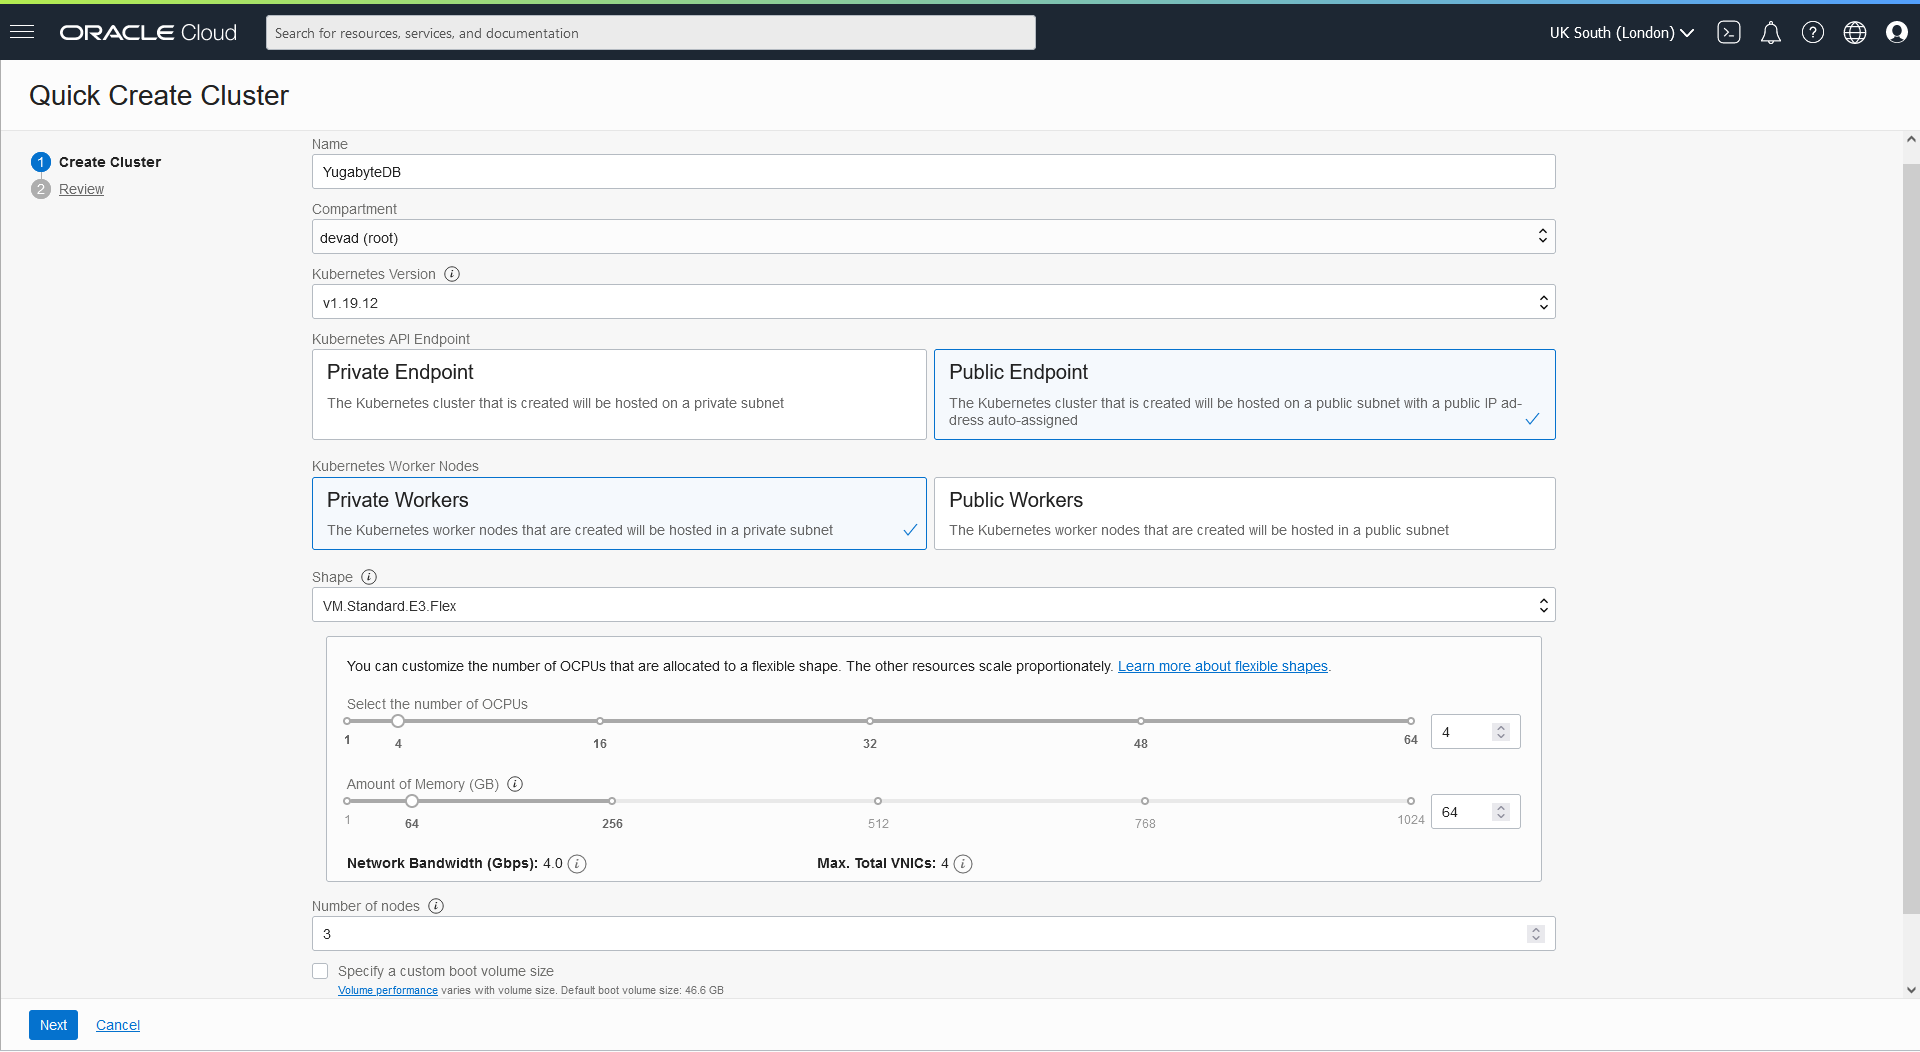
A first Node Pool will be created, with the number of nodes you define here. I define a 4 OCPU (= 4 Intel cores = 8 OS threads) shape per node in this pool and with Flex shapes you can size the CPU and RAM independently. Don’t forget that the database will be stored on each node, with two mounted block volumes. In the Advanced Options you can upload your public ssh keys if you want to access the nodes without kubectl.
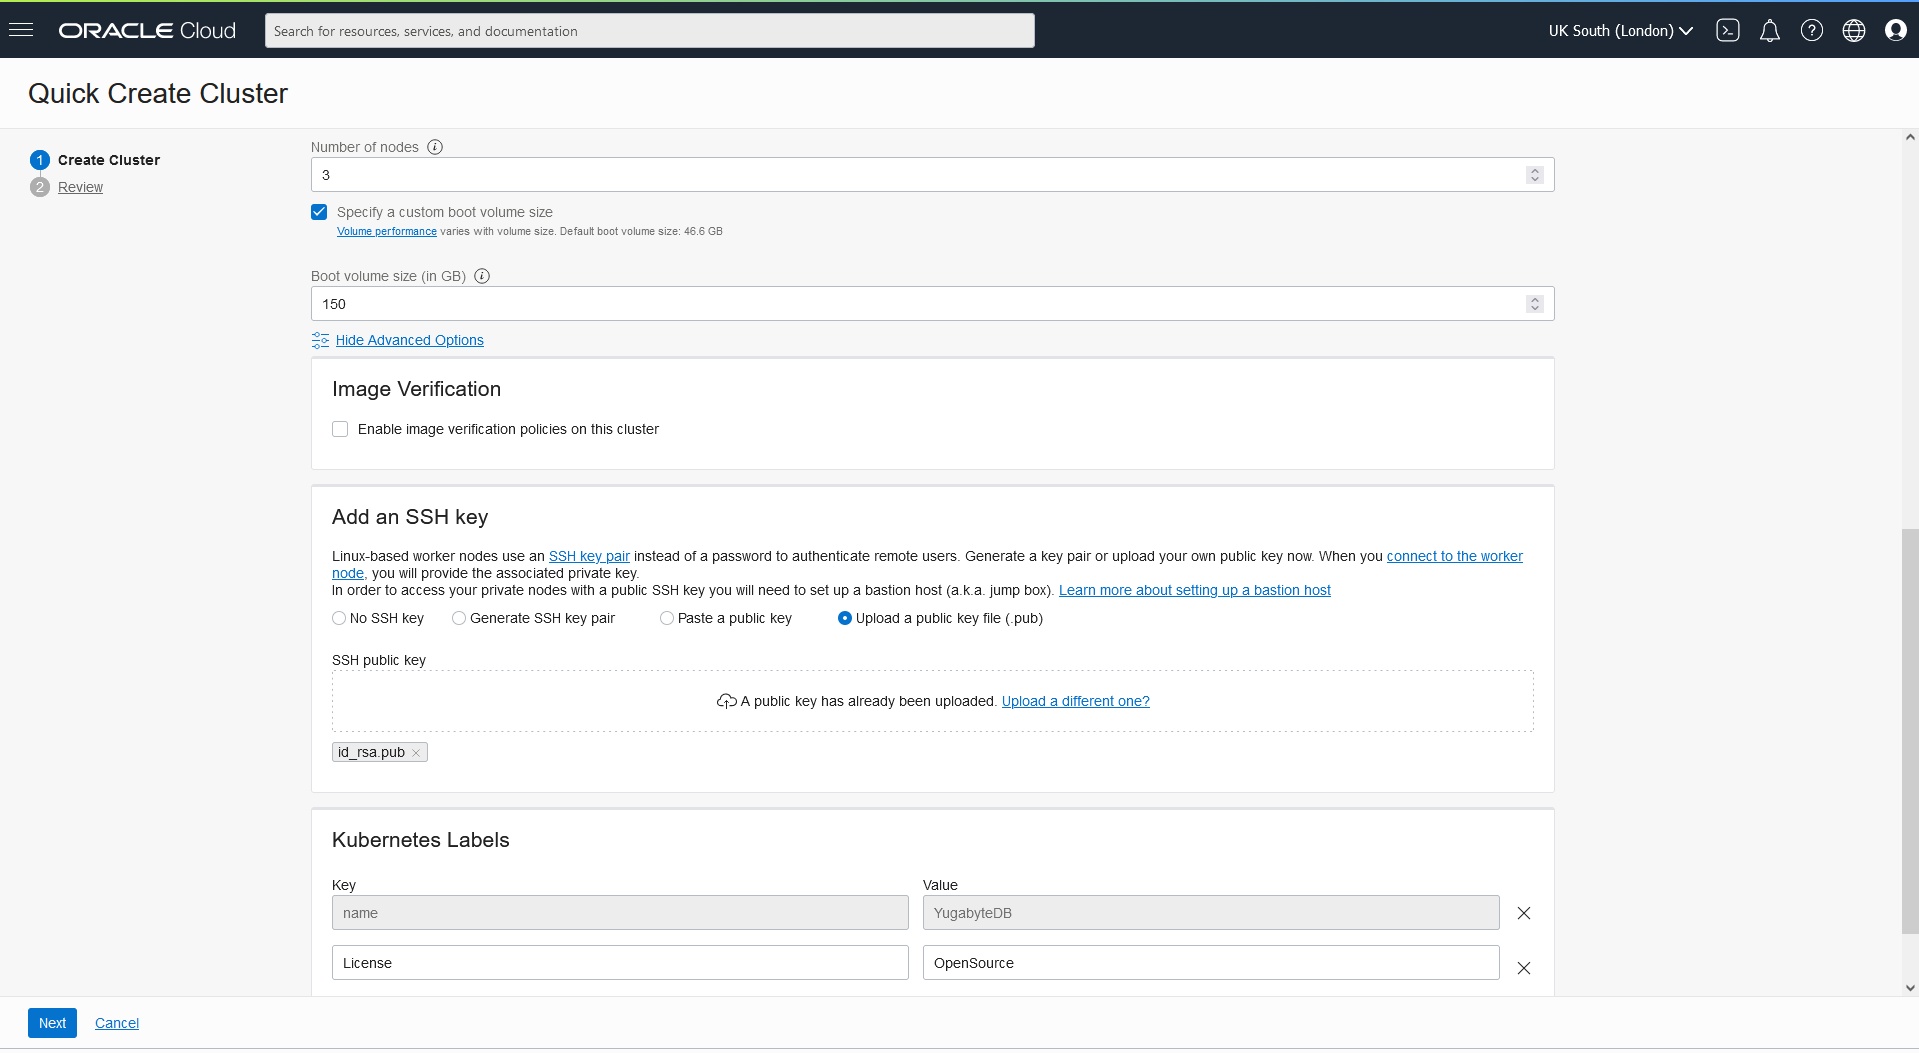
You can review and create it directly, or “Save as Stack” to create it with Terraform later:
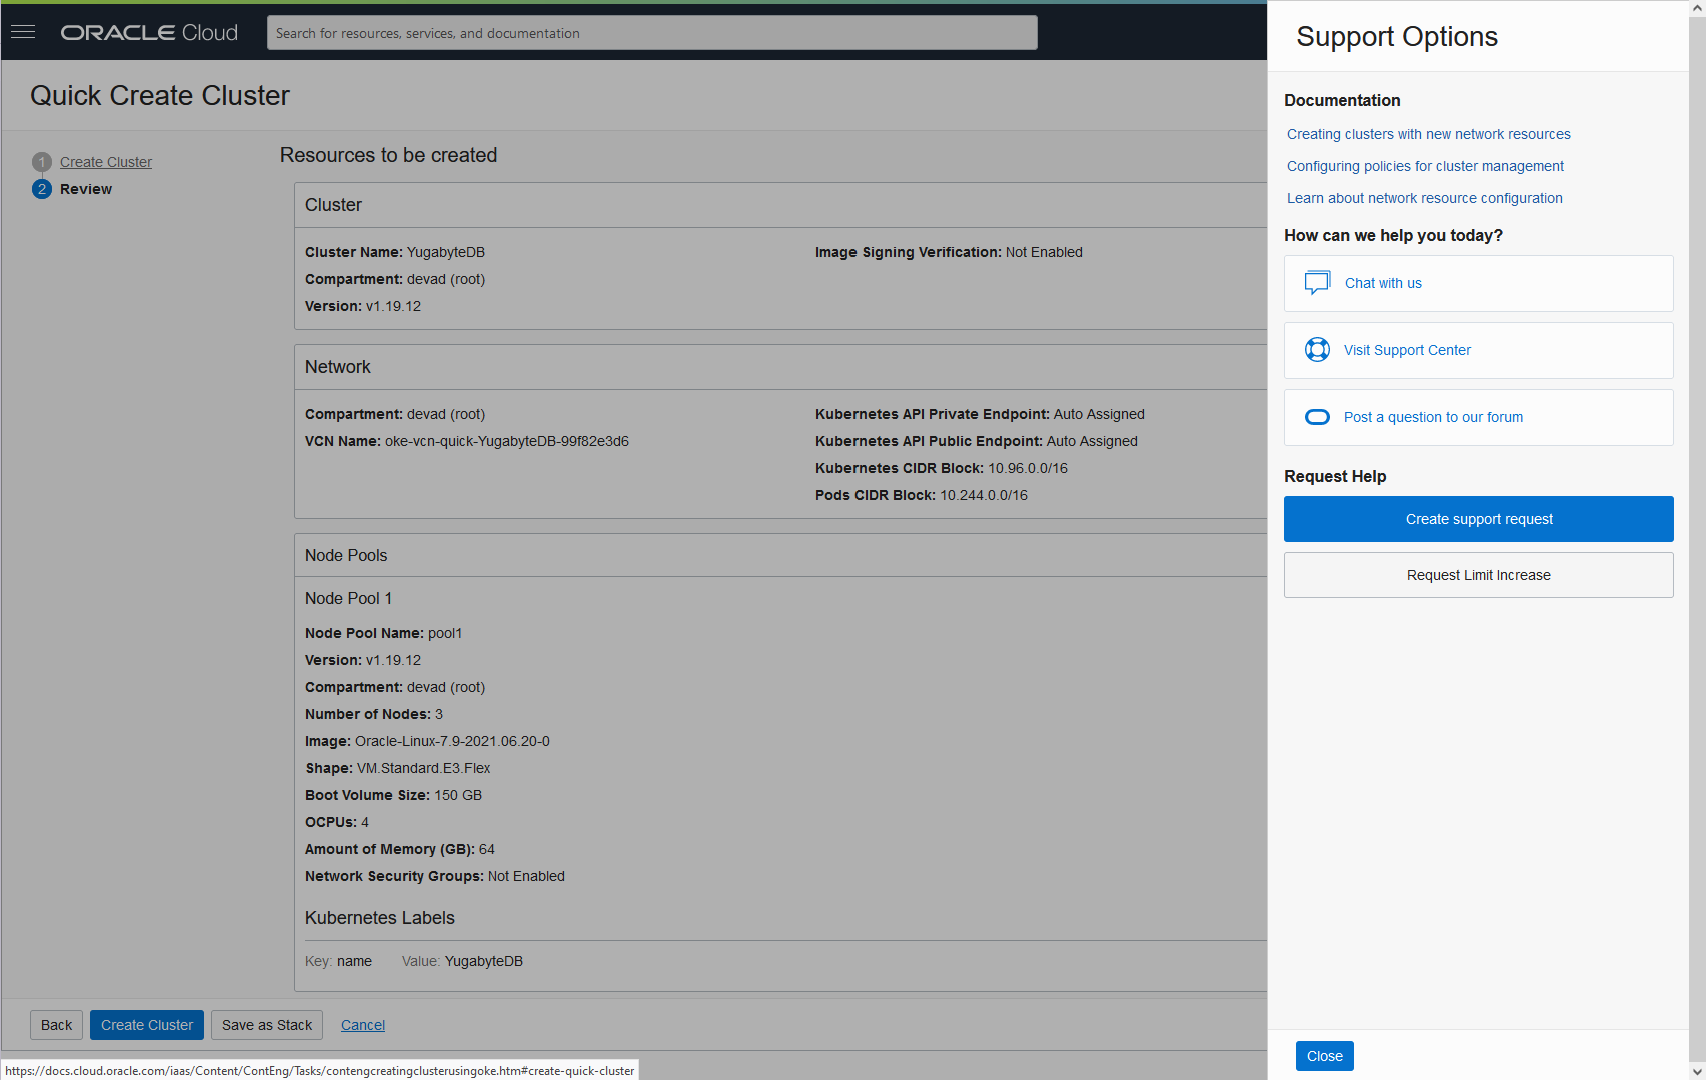
You can also look at the support tab which you can access with the new Ring Buoy icon which floats on the right of the screen.
Here are the services being created (with their OCID – the identifier in the Oracle Cloud):
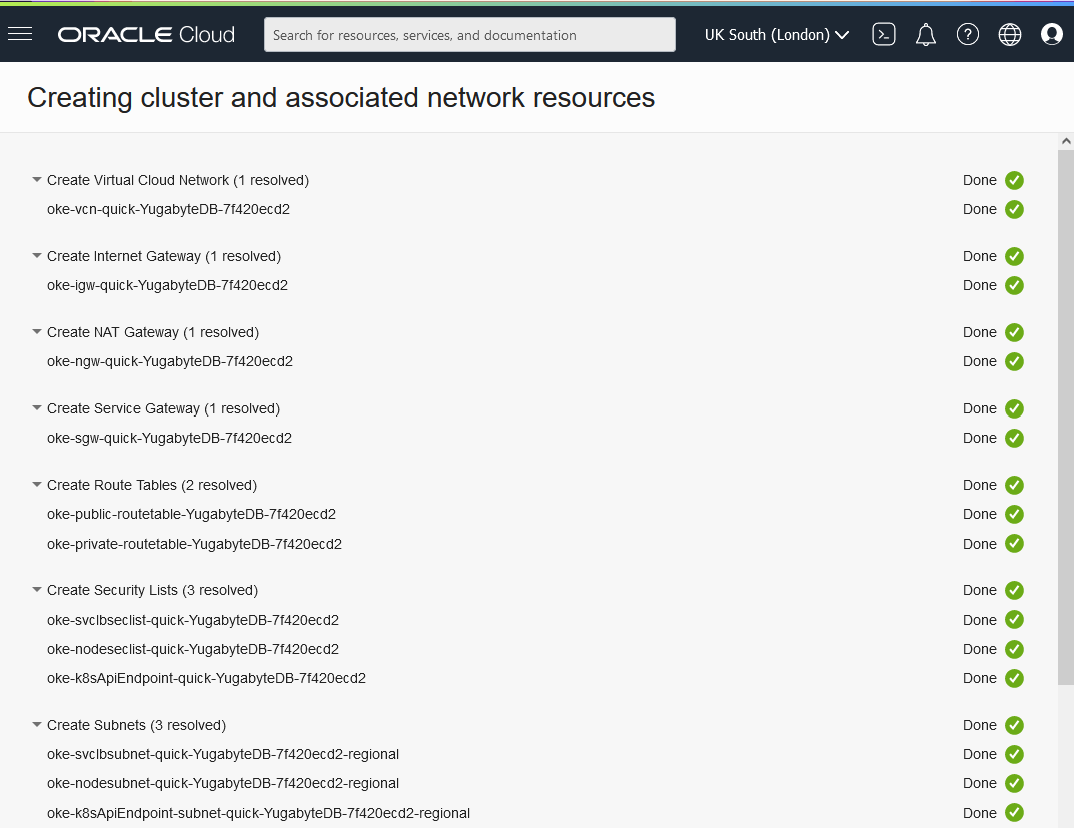
With this I have 3 nodes running, one in each Availability Domain (the OCI equivalent of Availability Zone) which I can see in the “Compute” service, with my other VMs:

This is what will be billed. If you want to stop the nodes you can scale down the pool to zero nodes.
Of course there will still be the Block Volumes and Load Balancers as well in the bill when you have all nodes stopped.
Kubeconfig
Now, the easiest way to install YugabyteDB is to continue with kubectl from the Cloud Shell and have all of the information to set the configuration be visible from the Access Cluster button. This builds the KUBECONFIG.
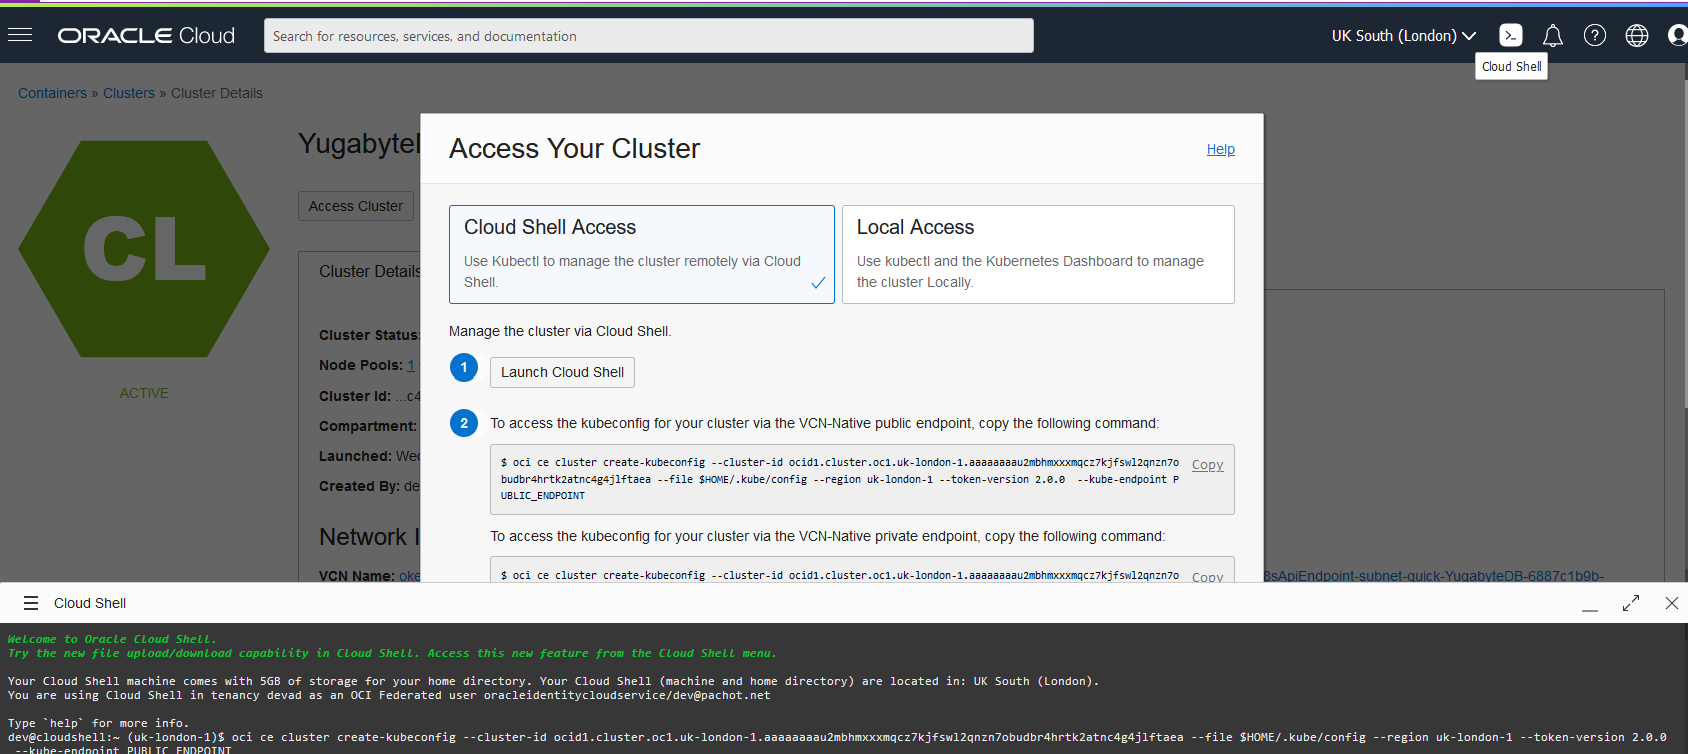
Here is the command (of course you should not copy/paste the exact below command but copy the detail for your cluster, from Quick Start / Access Cluster):
dev@cloudshell:~ (uk-london-1)$ umask 066
dev@cloudshell:~ (uk-london-1)$ oci ce cluster create-kubeconfig --cluster-id ocid1.cluster.oc1.uk-london-1.aaaaaaaadlkettlvl4frdlz6m7j6oiqvcupse4z6qzbdtxw74cbz655xbyfq --file $HOME/.kube/config --region uk-london-1 --token-version 2.0.0  --kube-endpoint PUBLIC_ENDPOINT
I’ve set umask to have it readable by myself only. You can do that afterwards too.
dev@cloudshell:~ (uk-london-1)$ chmod 600 $HOME/.kube/config
Check the version:
dev@cloudshell:~ (uk-london-1)$ kubectl version
Client Version: version.Info{Major:"1", Minor:"18", GitVersion:"v1.18.10", GitCommit:"a84e568eeb56c4e3966314fc2d58374febd12ed7", GitTreeState:"clean", BuildDate:"2021-03-09T14:37:57Z", GoVersion:"go1.13.15 BoringCrypto", Compiler:"gc", Platform:"linux/amd64"}
Server Version: version.Info{Major:"1", Minor:"19", GitVersion:"v1.19.12", GitCommit:"396aaa6314665118cf108193f0cc2318f7112979", GitTreeState:"clean", BuildDate:"2021-06-30T16:15:03Z", GoVersion:"go1.15.13 BoringCrypto", Compiler:"gc", Platform:"linux/amd64"}
Helm is already installed:
dev@cloudshell:~ (uk-london-1)$ helm version
version.BuildInfo{Version:"v3.3.4", GitCommit:"82f031c2db91441a56f7b05640a3dbe211222e81", GitTreeState:"clean", GoVersion:"go1.15.10"}
Install YugabyteDB
I’m ready to create a YugabyteDB cluster, from helm charts, which is all documented: https://docs.yugabyte.com/preview/deploy/kubernetes/single-zone/oss/helm-chart/
Adding the YugabyteDB chart to the repository:
dev@cloudshell:~ (uk-london-1)$ helm repo add yugabytedb https://charts.yugabyte.com
"yugabytedb" has been added to your repositories
Update it:
dev@cloudshell:~ (uk-london-1)$ helm repo update
Hang tight while we grab the latest from your chart repositories...
...Successfully got an update from the "yugabytedb" chart repository
Update Complete. ⎈Happy Helming!⎈
Checking the YugabyteDB version:
dev@cloudshell:~ (uk-london-1)$ helm search repo yugabytedb/yugabyte
NAME                    CHART VERSION   APP VERSION     DESCRIPTION
yugabytedb/yugabyte     2.7.1           2.7.1.1-b1      YugabyteDB is the high-performance distributed ...
Ready to install in its dedicated namespace:
dev@cloudshell:~ (uk-london-1)$ kubectl create namespace yb-demo
namespace/yb-demo created

dev@cloudshell:~ (uk-london-1)$ helm install yb-demo yugabytedb/yugabyte --namespace yb-demo --wait --set gflags.tserver.ysql_enable_auth=true,storage.master.storageClass=oci-bv,storage.tserver.storageClass=oci-bv
I enabled authentication (default ‘yugabyte’ user password is ‘yugabyte’). Authentication is enabled with theTServer flag ‘ysql_enable_auth’ set to true.
Note about Storage Class
Note that on my first attempt, without mentioning StorageClass, I got it failing with something like this because the default is not correct:
dev@cloudshell:~ (uk-london-1)$ kubectl describe pod --namespace yb-demo
…
Events:
  Type     Reason            Age    From               Message
  ----     ------            ----   ----               -------
  Warning  FailedScheduling  6m44s  default-scheduler  no nodes available to schedule pods
  Warning  FailedScheduling  6m43s  default-scheduler  no nodes available to schedule pods
  Warning  FailedScheduling  6m39s  default-scheduler  0/1 nodes are available: 1 pod has unbound immediate PersistentVolumeClaims.
  Warning  FailedScheduling  6m18s  default-scheduler  0/3 nodes are available: 3 pod has unbound immediate PersistentVolumeClaims.
The reason for unbound PersistentVolumeClaims was:
Events:
  Type     Reason              Age                 From                         Message
  ----     ------              ----                ----                         -------
  Warning  ProvisioningFailed  4m (x142 over 39m)  persistentvolume-controller  storageclass.storage.k8s.io "standard" not found
Let’s check the storageclass:
dev@cloudshell:~ (uk-london-1)$ kubectl get storageclass
NAME            PROVISIONER                       RECLAIMPOLICY   VOLUMEBINDINGMODE      ALLOWVOLUMEEXPANSION   AGE
oci (default)   oracle.com/oci                    Delete          Immediate              false                  3h32m
oci-bv          blockvolume.csi.oraclecloud.com   Delete          WaitForFirstConsumer   false                  3h32m
This is the reason I mentioned the ‘oci-bv’ (Container Storage Interface to the Block Volumes) storage class with: --set storage.master.storageClass=oci-bv,storage.tserver.storageClass=oci-bv
Checking installation
The install takes a few minutes and here are the pods up and running:
dev@cloudshell:~ (uk-london-1)$ kubectl --namespace yb-demo get pods
NAME       READY   STATUS RESTARTS   AGE
yb-master-0 1/1 Running   0      100s
yb-master-1 1/1 Running   0      100s
yb-master-2 1/1 Running   0      100s
yb-tserver-0   1/1 Running   0      100s
yb-tserver-1   1/1 Running   0      100s
yb-tserver-2   1/1 Running   0      100s
kubectl exec allows you to perform a shell command after ‘--‘. I can check on the filesystems, memory, and cpu for a node in this way:
dev@cloudshell:~ (uk-london-1)$ kubectl exec --namespace yb-demo -it yb-tserver-0 -- df -Th /mnt/disk0 /mnt/disk1
Defaulting container name to yb-tserver.
Use 'kubectl describe pod/yb-tserver-0 -n yb-demo' to see all of the containers in this pod.
Filesystem Type  Size  Used Avail Use% Mounted on
/dev/sdd   ext4   50G   77M   47G   1% /mnt/disk0
/dev/sde   ext4   50G   59M   47G   1% /mnt/disk1
dev@cloudshell:~ (uk-london-1)$ kubectl exec --namespace yb-demo -it yb-tserver-0 -- free -h
Defaulting container name to yb-tserver.
Use 'kubectl describe pod/yb-tserver-0 -n yb-demo' to see all of the containers in this pod.
total    used    free  shared  buff/cache   available
Mem:        30G    1.1G     23G     36M    6.5G     29G
Swap:        0B      0B      0B
dev@cloudshell:~ (uk-london-1)$ kubectl exec --namespace yb-demo -it yb-tserver-0 -- lscpu
Defaulting container name to yb-tserver.
Use 'kubectl describe pod/yb-tserver-0 -n yb-demo' to see all of the containers in this pod.
Architecture:      x86_64
CPU op-mode(s):    32-bit, 64-bit
Byte Order:        Little Endian
CPU(s):            8
On-line CPU(s) list:   0-7
Thread(s) per core: 2
Core(s) per socket: 4
Socket(s):         1
NUMA node(s):      1
Vendor ID:         AuthenticAMD
CPU family:        23
Model:             49
Model name:        AMD EPYC 7742 64-Core Processor
Stepping:          0
CPU MHz:           2245.780
BogoMIPS:          4491.56
Hypervisor vendor: KVM
Virtualization type:   full
L1d cache:         64K
L1i cache:         64K
L2 cache:          512K
L3 cache:          16384K
NUMA node0 CPU(s): 0-7
Flags:             fpu vme de pse tsc msr pae mce cx8 apic sep mtrr pge mca cmov pat pse36 clflush mmx fxsr sse sse2 ht syscall nx mmxext fxsr_opt pdpe1gb rdtscp lm rep_good nopl cpuid extd_apicid tsc_known_freq pni pclmulqdq ssse3 fma cx16 sse4_1 sse4_2 x2apic movbe popcnt tsc_deadline_timer aes xsave avx f16c rdrand hypervisor lahf_lm cmp_legacy cr8_legacy abm sse4a misalignsse 3dnowprefetch osvw topoext perfctr_core ssbd ibpb stibp vmmcall fsgsbase tsc_adjust bmi1 avx2 smep bmi2 rdseed adx smap clflushopt clwb sha_ni xsaveopt xsavec xgetbv1 nt_good arat umip
I can execute YSQLSH to connect to my database in the following way. The alter role command changes the yugabyte superuser password. Do not let passwords retain their default value for anything that you care about:
dev@cloudshell:~ (uk-london-1)$ kubectl exec --namespace yb-demo -it yb-tserver-0 -- /home/yugabyte/bin/ysqlsh
Defaulting container name to yb-tserver.
Use 'kubectl describe pod/yb-tserver-0 -n yb-demo' to see all of the containers in this pod.
Password for user yugabyte:
ysqlsh (11.2-YB-2.7.1.1-b0)
Type "help" for help.
yugabyte=# select version();
version
------------------------------------------------------------------------------------------------------------
 PostgreSQL 11.2-YB-2.7.1.1-b0 on x86_64-pc-linux-gnu, compiled by gcc (Homebrew gcc 5.5.0_4) 5.5.0, 64-bit
(1 row)
yugabyte=# alter role yugabyte with password 'yb4oci4oke';
ALTER ROLE
yugabyte=# \q
dev@cloudshell:~ (uk-london-1)$
Please mind the defined public endpoints. Like mentioned earlier, this is probably not a good idea for anything else than a demo cluster:
dev@cloudshell:~ (uk-london-1)$ kubectl --namespace yb-demo get services
NAME                     TYPE               CLUSTER-IP         EXTERNAL-IP           PORT(S)                                                                          AGE

yb-master-ui             LoadBalancer   10.96.156.48   152.67.136.107        7000:30910/TCP                                                                   12m

yb-masters               ClusterIP          None               <none>                7000/TCP,7100/TCP                                                                12m

yb-tserver-service   LoadBalancer   10.96.94.161   140.238.120.201   6379:31153/TCP,9042:31975/TCP,5433:31466/TCP                                     12m

yb-tservers              ClusterIP          N
This means that I can connect to the YSQL port from any PostgreSQL client, like:
psql postgres://yugabyte:yb4oci4oke@140.238.120.201:5433/yugabyte
From kubectl --namespace yb-demo get services you see other ports. 5433 is the YSQL (PostgreSQL compatible) endpoint exposed by yb-tservers, through the load balancer. The whole cluster view is exposed by yb-masters on https://152.67.136.107:7000 in my example.
Here is an example:
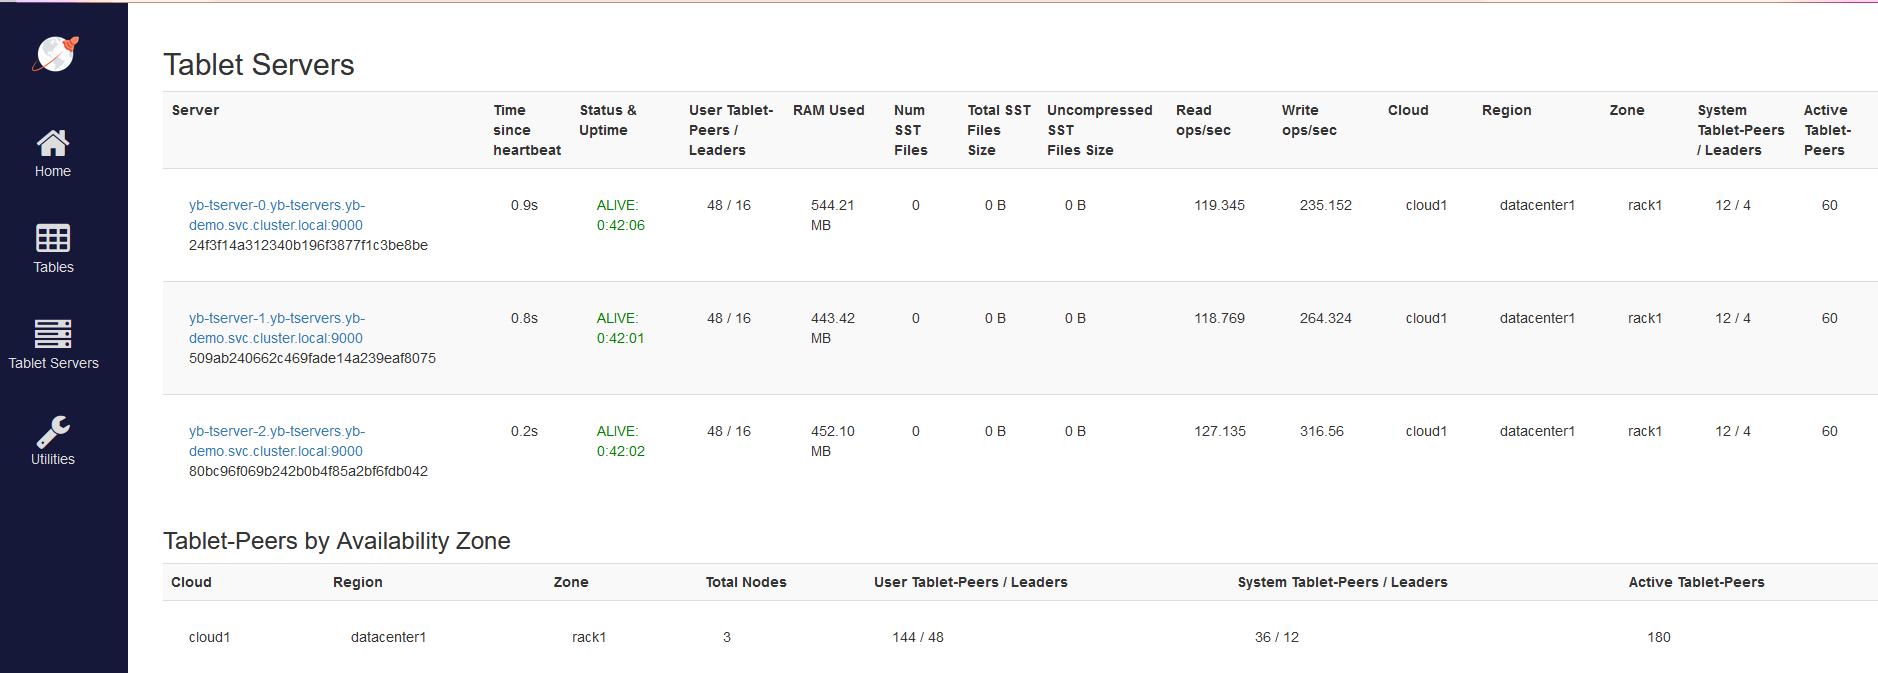
I’ve cut the screenshot so that you don’t see the code to reclaim a T-shirt but, if you install it, you can get it. 😉 The read/write operations were limited by running the pgbench client from a free 1/8th OCPU but the 4 OCPU nodes can do more.
Kubectl
I find the Cloud Shell very handy for ad-hoc commands, but you may want to use oci-cli kubectl on your laptop (the below example is on Windows):
On Powershell, as administrator, install the OCI CLI:
md oke
cd oke
Set-ExecutionPolicy RemoteSigned
Invoke-WebRequest https://raw.githubusercontent.com/oracle/oci-cli/master/scripts/install/install.ps1 -OutFile install.ps1
./install.ps1 -AcceptAllDefaults
cd ..
rd oke
On the Command Prompt, setup the connection to the cloud tenant:
oci setup config
oci setup repair-file-permissions --file C:\Users\franc\.oci\oci_api_key.pem
type oci_api_key_public.pem
The setup config asks for some OCID which you can get from the web console (upper-right icon):
- Tenancy (https://cloud.oracle.com/tenancy)
- User Settings (https://cloud.oracle.com/identity/users)
The public key generated must be added to the user, in User Settings “Add API Key”. I usually leave only 2 API keys as the maximum is 3 and I don’t want to get blocked when I need to do something.
Cleanup
It is a lab. In order to reduce the cost when not used, you can scale down to zero nodes. And when you want to drop the cluster, you also need to delete the persistent volumes:
dev@cloudshell:~ (uk-london-1)$ helm uninstall yb-demo -n yb-demo
release "yb-demo" uninstalled
dev@cloudshell:~ (uk-london-1)$ kubectl delete pvc --namespace yb-demo --all
persistentvolumeclaim "datadir0-yb-master-0" deleted
persistentvolumeclaim "datadir0-yb-master-1" deleted
persistentvolumeclaim "datadir0-yb-master-2" deleted
persistentvolumeclaim "datadir0-yb-tserver-0" deleted
persistentvolumeclaim "datadir0-yb-tserver-1" deleted
persistentvolumeclaim "datadir0-yb-tserver-2" deleted
persistentvolumeclaim "datadir1-yb-master-0" deleted
persistentvolumeclaim "datadir1-yb-master-1" deleted
persistentvolumeclaim "datadir1-yb-master-2" deleted
persistentvolumeclaim "datadir1-yb-tserver-0" deleted
persistentvolumeclaim "datadir1-yb-tserver-1" deleted
persistentvolumeclaim "datadir1-yb-tserver-2" deleted
dev@cloudshell:~ (uk-london-1)$ kubectl delete namespace yb-demo
namespace "yb-demo" deleted
You can now Terminate the cluster. Note that if you didn’t do the previous cleanup, the block volumes and load balancer will stay. Here is my cost explorer when I was trying all that, creating and removing the cluster with terraform but without cleaning up the install:

Note that, beyond the price, leaving load balancers may prevent further creation as it is limited per-tenant.
This setup allows the creation of a Replication Factor 3 YugabyteDB universe, where rolling upgrades are possible because nodes can be restarted, one at a time. With Kubernetes, you can scale-out as needed and YugabyteDB manages the rebalancing of the shards automatically. Of course, for High Availability, you will have nodes in different Availability Domains (the AZ equivalent in OCI). The nice thing here is that the network traffic is free between Availability Domains in the Oracle Cloud. You can even have a node on your premises, and egress is free if you have FastConnect (the Direct Connect equivalent on OCI).
If you are in Europe in October, I’ll talk and demo this at HrOUG – the Croatian Oracle User Group: https://2021.hroug.hr/eng/Speakers/FranckPachot.
What’s Next?
Give Yugabyte Cloud a try by signing up for a free tier account in a couple of minutes. Got questions? Feel free to ask them in our YugabyteDB community Slack channel.


