Securing YugabyteDB: Part 1 – Server-to-Server Encryption in Transit
Encryption in transit is a common requirement for client-to-server communication. It is particularly important for YugabyteDB, a 100% open source, distributed SQL database built to accelerate cloud native agility. YugabyteDB typically stores important user and customer data at an organization.
In this ongoing blog series, we take a look at the different aspects of encryption in transit for YugabyteDB. This first post will focus on encryption in transit for the database’s internal RPC communication protocol, sometimes called server-to-server encryption.
What is encryption in transit?
More specifically, encryption in transit is sometimes referred to as TLS encryption, after the most popular protocols used to perform encryption in transit. Similar to the widespread deployment of TLS on public websites (as HTTPS), encryption in transit is also becoming the default mode of deployment for cross-service communication inside internal private networks.
There are three different goals organizations may choose to achieve with encryption in transit.
- Make it cryptographically impossible to snoop or modify network communications.
- Enable the client to identify and verify the server.
- Enable the server to identify and verify the client.
The first goal is a common minimum requirement, while the latter depends on the specific use case. Another name for achieving Goal 2 and Goal 3 is mutual TLS (mTLS).
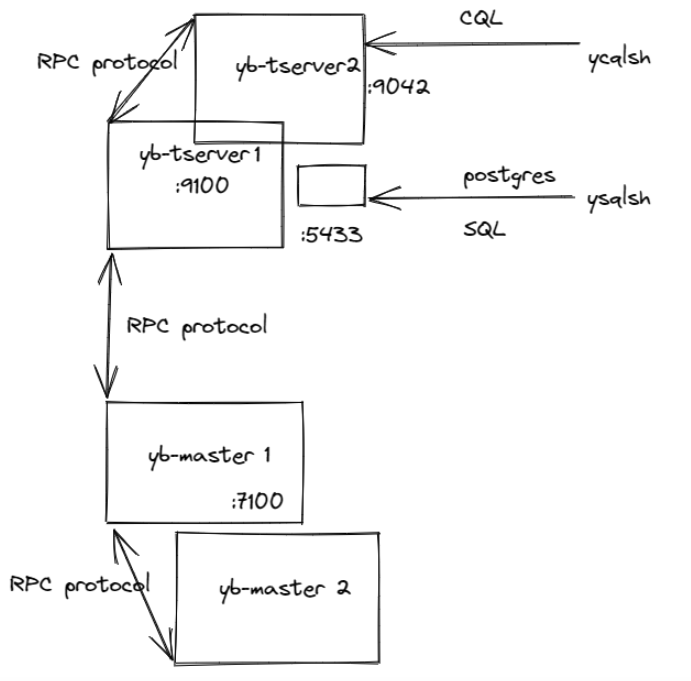
However, in YugabyteDB, encryption in transit enables three kinds of client-to-server communication, as illustrated in the below diagram.

- Internal RPC communication between YugabyteDB hosts, sometimes referred to as server-to-server encryption in YugabyteDB docs. This involves ports 7100 and 9100 of the master and tserver hosts.
- YCQL database clients. This involves port 9042 on the tserver hosts.
- YSQL database clients. This involves port 5433 on the tserver hosts, where a postgres process translates SQL queries to internal tserver RPCs.
A brief overview of the TLS protocol
During a TLS handshake, the client and server establish shared session keys for symmetric encryption of future data sent over the connection. The key steps relevant to this post are as follows.
- A Certificate Authority (CA) that both parties trust signs a server’s public certificate. The client can choose to verify different aspects of this certificate to establish that it is talking to the right server.
- The client may also present its public (CA-signed) certificate. The server may then use this certificate to verify the client. In some cases, the client certificate authenticates the client without the need for a separate authentication scheme like username / password.
- Finally, the client and server can negotiate the specific versions of TLS involved.
Encryption in transit for server-to-server communication
Internal YugabyteDB communication between the master and tserver processes on different hosts uses a custom RPC protocol that transfers protobuf-serialized messages.
To enable TLS communication for this internal RPC protocol, the yb-tserver and yb-master processes specify the following command line flags.
- –use_node_to_node_encryption=true
- –certs_dir=<path to a directory>, e.g.
- –certs_dir=/home/yugabyte/yugabyte-tls-config/
The directory pointed to by this flag contains three files in PEM format.
- ca.crt – The public certificate of the CA that this YugabyteDB server should trust. This is the CA that will verify other certificates. YugabyteDB does not trust any system CA certificates that might already be present on the host. A chain of root and intermediate CA certificates make up this single file.
- node.<host-ip-address>.crt – public server certificate for this host.
- node.<host-ip-address>.key – private key for the server certificate for this host.
Once a yb-tserver or yb-master specifies these command-line flags, that process will use TLS for all internal RPCs, whether it is acting as an RPC client or an RPC server. This achieves Goal 1 above for internal RPC communication.
By default, an RPC client will verify the following details of the presented RPC server certificate.
- 2a Verifies that the CA specified in ca.crt signs the server certificate.
- 2b Verifies that the Common Name or Subject Alternative Name (SAN) in the server certificate contains the IP or hostname used by the client to initiate connection to the server.
This verification achieves Goal 2 above for internal RPC communication. To customize this verification, see the details in the following sections.
By default, the RPC server does not verify the RPC client certificate. To enable this verification and achieve Goal 3 for internal RPC communication, see the details in the following sections.
Customizing the verification of RPC server certificate by the client
Maintaining hostname and IP addresses in server certificates can be challenging. For example, when certificate issuance requires manual approval and clusters need to expand faster than that. For such situations, there are two ways to customize the verification.
- Setting –verify_server_endpoint=false disables the verification in 2b while keeping the CA verification check in 2a.
- Instead of checking for an IP/hostname in the server certificate, the RPC client verifies a specific user id. The Common Name or a SAN field of type UID accept certificates that contain this user id. Setting –verify_server_endpoint=false and –node_to_node_encryption_required_uid=<userid> achieves this goal.
Customizing the verification of RPC client certificate by the server
Setting –node_to_node_encryption_use_client_certificates=true enables the verification of the RPC client certificate by the server. When enabled, the RPC server verifies that the client certificate is signed by the CA. Here are two ways to enable further verification.
- Setting –verify_client_endpoint=true will require the client to present a certificate with its outgoing IP in the Common Name or as a SAN field.
- Setting –node_to_node_encryption_required_uid=<userid> instead will require the client to present a certificate with that specific userid in the Common Name or in a SAN field of type UID.
Using RPC client based tools
YugabyteDB also ships with useful utilities like yb-admin and yb-ts-cli. These tools allow administrators to view or modify internal database configuration. They typically make RPC calls to the yb-master or yb-tserver processes. In order for these tools to work with a TLS-enabled cluster, the command line flag –certs_dir_name has to be set to a directory path. This path contains a ca.crt file specifying a CA public certificate. [1]
Min SSL version
Organizations may wish to disallow older versions of the TLS protocol. The –ssl_protocols flag can be used to specify an explicit allowlist of TLS protocols for YugabyteDB’s internal RPC communication. In order to specify a minimum TLS version of 1.2, for example, the flag would be set to tls12,tls13. The user of –cipher_list for TLS <= 1.2 and –ciphersuites for TLS >= 1.3 can configure specific ciphers. [2]
Conclusion
In follow-up posts, we’ll explain how these different dimensions of encryption in transit work for YugabyteDB’s client-to-server protocols, specifically for SQL and CQL clients. Because those clients use completely different protocols from YugabyteDB’s internal server-to-server communication, they work differently from the RPC protocol-specific configuration described here.
Yugabyte Anywhere, a self-managed DBaaS version of YugabyteDB for enterprises, helps companies manage their encryption in transit requirements. It does this by supporting custom CAs and CA-signed certificates. It also enables encryption in transit and rotating server and CA certificates seamlessly on managed database clusters.
[1] If mutual TLS is enabled, this RPC client certs directory needs to contain a separate client certificate that is setup to pass RPC server verification and a corresponding private key.
[2] In order to allow the db cluster to work during rolling upgrades when TLS may only be partially enabled, an —allow_insecure_connections=true flag can be set on both tserver and master processes.
You can build your own YugabyteDB-as-a-service on any cloud with Yugabyte Platform, the best fit for mission-critical deployments. Sign up today for a free 30-day trial!


